You don’t need a camera. Just Nano Banana Pro, Veo 3.1 and a simple system use to turn simple prompts into polished ads.. Ai Tools, Ai Fire 101, 🔥 Ai Fire Academy, Ai Automations, Ai Workflows.
TL;DR BOX
This four-step workflow shows you how to turn simple text ideas into real cinematic ads. I’ve done this a lot, and it works every time when you follow the steps using Nano Banana Pro for images and Veo 3.1 for motion. It prioritizes manual creative control over full automation for professional consistency.
The process starts with AI-assisted storyboarding, followed by generating style-consistent starting frames. Users convert these images into video clips using Veo 3.1 Fast, then stitch them together in an editor like CapCut. This allows creators to produce high-end marketing assets in hours without expensive equipment.
Key points
-
Stat: Most 8-second AI generations only yield about 1-3 seconds of usable footage.
-
Mistake: Automating the selection process; human judgment must pick the best starting frames.
-
Action: Use your first scene’s image as a reference for all subsequent shots to maintain visual consistency.
Critical insight
True quality comes from treating AI video generations as raw stock footage to be trimmed, rather than expecting perfect, ready-to-use clips immediately.
Table of Contents
I. Introduction: The Era of AI Marketing Is Here
Who doesn’t know Coca-Cola? But did you know their latest “big budget” ad was mostly AI? No film crew. No studio. Even though people argue about it, you can’t deny that those AI marketing campaigns still made Coca-Cola a lot of money.
If a global brand can pull this off, I’ll show you how to make your own version for almost nothing.
With Google’s new Nano Banana Pro, creating professional-quality video ads no longer takes weeks or thousands of dollars; it takes hours. Until now, AI-generated video simply couldn’t look this good.
I’ve been testing Nano Banana Pro and Veo 3.1 since launch and the biggest discovery is this: you can get studio-quality ads if you follow a very specific 4-step workflow.
No camera. No gear. No experience.
I’ll show you the exact method I use so you can replicate it for your own campaigns.
II. What Is the Four-Step Cinematic AI Workflow?
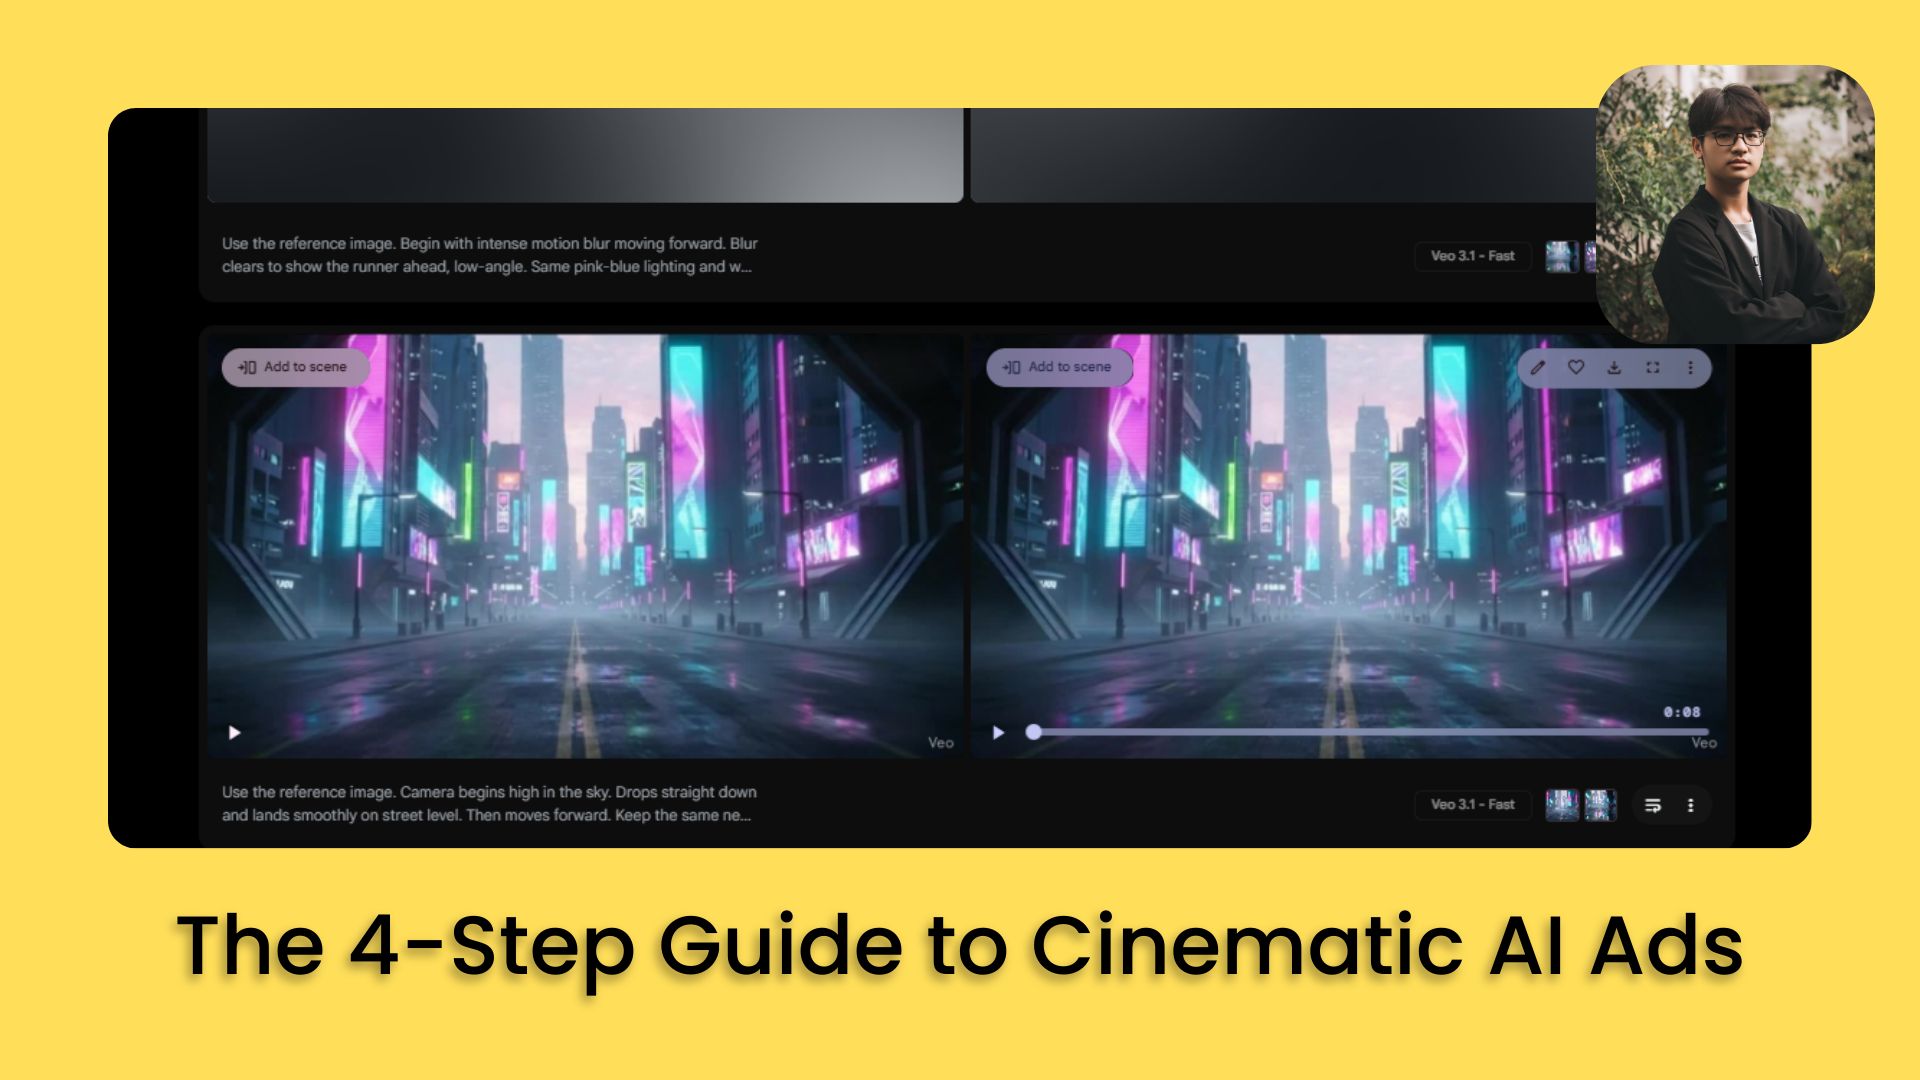
The workflow has four clear stages: storyboard, image creation, video generation and final production. You first plan scenes, then create still frames, then turn those frames into motion, then edit everything into a single ad Each stage builds on the last, so your final result feels intentional instead of random.
Key takeaways
-
Step 1. Storyboard the idea into clear scenes.
-
Step 2. Generate style-consistent images in Nano Banana Pro.
-
Step 3. Use Veo 3.1 to turn images into moving clips.
-
Step 4. Edit clips together with music and timing.
Quality comes from respecting all four steps. Skipping straight to “make a video” leads to messy results.
Creating professional AI video content follows a clear, repeatable framework for AI ads:
-
Storyboarding: Define your video concept and break it into separate scenes.
-
Image Creation: Generate the starting frame for each scene using Nano Banana Pro.
-
Video Creation: Transform your images into video clips using AI video generators.
-
Production: Stitch everything together into your final polished video.
Each step builds on the previous one, creating a workflow that transforms rough ideas into polished, professional AI ads.
Let’s get into each step in detail.

III. Step 1: Storyboarding – Building Your Creative Foundation
Storyboarding is where everything begins for successful AI ads. Before you generate a single image or video clip, you need two critical elements:
-
A clear vision of what your AI video is about.
-
Separate scene descriptions, the individual shots that will make up your video.
You need both of these before you start creating images.
1. Using AI to Accelerate the Storyboarding Process
AI is great at helping you improve ideas quickly rather than starting from absolute zero. I use ChatGPT (with custom GPT), Claude or Gemini to help develop my storyboard.
The process is conversational. I tell the AI what I am trying to create and it helps me flesh out the concept and break it into scenes.

If you want to know how to create your own GPT like the image above, this step-by-step guide is for you.
Learn How to Make AI Work For You!
Transform your AI skills with the AI Fire Academy Premium Plan – FREE for 14 days! Gain instant access to 500+ AI workflows, advanced tutorials, exclusive case studies and unbeatable discounts. No risks, cancel anytime.
Start Your Free Trial Today >>
2. Example: Designing a Nike Running Ad With a Futuristic City Theme
Here’s how a storyboard could develop for a sample project:
-
Concept: A high-energy Nike running spot set in a neon-lit futuristic city, something that feels like Blade Runner meets marathon training.
-
Why it works: Nike already leans into innovation, motion and athletic intensity. A sleek, tech-forward aesthetic fits the brand perfectly.
Seven separate scenes:
-
Distant skyline glowing with neon, early morning fog drifting between buildings.
-
Wide shot of empty streets illuminated by digital billboards.
-
Close-up of running shoes landing on the pavement.
-
Side profile of the runner accelerating.
-
Over-the-shoulder shot showing reflections on glass buildings.
-
Product close-up on the shoes: mesh texture, sole design and laces.
-
Final shot: the runner sprinting toward the camera through streaks of neon.

Important: You are not a slave to AI. You don’t have to use exactly what the AI generates. The storyboard should get your creative gears turning, not dictate every detail.
In practice, I might take the general concept but modify specific elements. Once you have the general idea and your scene breakdown, you are done with Step 1.
IV. Step 2: Image Creation – Building Your Visual Foundation
I used to skip this part and my videos always looked messy.
This is arguably the most important step for your AI ads because everything flows from your original image. The quality of your starting frames will determine the quality of your final video.
You will be working inside Nano Banana Pro, which is accessible through multiple platforms: Gemini and AI Studio.
1. Generate Multiple Prompt Variations
Don’t ask for one prompt. Ask for four or five variations of the same scene to increase your chances of success with AI ads. This makes it much more likely you will get an image you actually like.
For example, if your first scene is “Neon Dawn Skyline”, ask the AI to give you five different ways to prompt that scene, each with slightly different angles, elements or emphasis.

2. Create Images in Nano Banana Pro
Copy each prompt variation and paste it into Nano Banana Pro. Generate images for all the variations.
Now you have multiple options to compare. You might find that option one captures your vision better than the original idea. Having options lets you make smart, creative decisions.

3. The Critical Step: Maintaining Visual Consistency
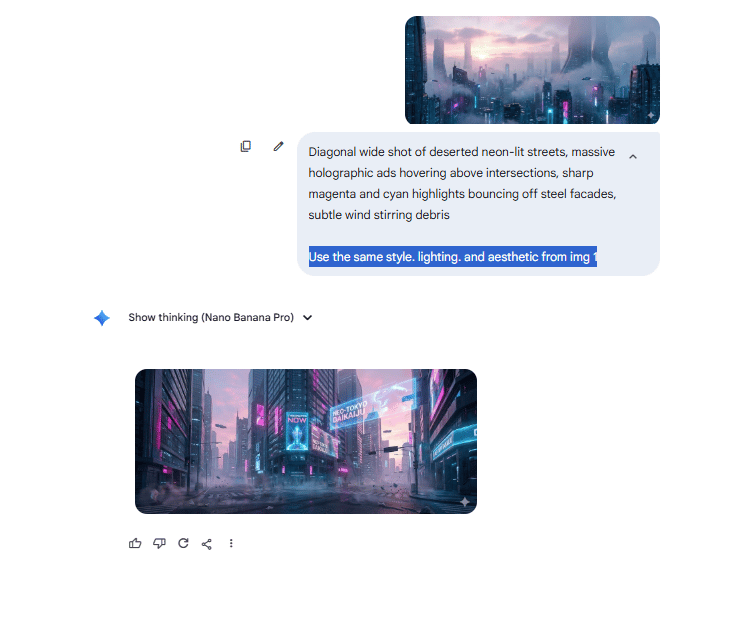
This is the part where most people break their video without realizing it: inconsistent style across scenes. For your first scene, generate images until you find one you love. This becomes your style anchor.
For every scene after the first one:
-
Add your first scene’s image as a reference in Nano Banana Pro.
-
Include this instruction in your prompt: “Use the same style, lighting and aesthetic from image one”.
This ensures that all follow-on images match the style, feel and aesthetic of your foundational image. Without this, your scenes will feel disconnected and your final video will look like a disjointed collection of random clips.
Character and Object Consistency: When creating images that include characters or objects from previous scenes, you must reference those previous images. For example, if Scene 1 establishes your shoes and Scene 4 is a close-up of those same shoes:
-
Add the Scene 1 image as a reference.
-
Modify the AI-generated prompt to clearly reference the elements: “while keeping shoe details consistent with the original reference image”.

Pro Tip: Always reference your anchor image. When generating images for scenes 2, 3, 4 and beyond, always reference your first scene image, not just the immediately previous scene. This prevents the images from changing too much, where each image looks different from the last until you have lost your original style entirely.
V. Step 3: Video Creation – Bringing Your Images to Life
Now you will transform your static images into dynamic video clips.
1. Generating Video Prompts
Go back to your AI assistant (ChatGPT, Claude or Gemini) and provide all the images you created.
Tell the AI:
Give me text-to-video prompts for these scenes, using each of these images as a reference.The AI will analyze each image and create prompts that describe motion, camera movement and action appropriate for that scene.

Important difference: You are only asking for one prompt per scene, not five variations. Why? Cost and time. If you have 10 scenes and generate five video variations for each, that is 50 videos, too expensive and too time-consuming. You need to nail the prompt on the first try.

2. Using Veo 3.1 Fast for Video Generation
Take your video prompts to Veo 3.1 Fast. This is Google’s AI video generation model, accessible through Flow or Gemini.
-
Why Veo 3.1 Fast? After testing over 100 videos using Veo 3.1 and Veo 3.1 Fast. This model is faster and significantly cheaper than the regular version and the quality gap isn’t huge for most applications.
-
Critical Requirement: You need a video generation model that allows you to add a starting frame, which is essential for visual consistency in AI ads. Your Nano Banana Pro image becomes the first frame of your video, ensuring visual consistency.

3. The Reality of Iteration
You probably won’t get every scene right on the first try. That is normal.
If you have 10 scenes, expect to regenerate at least a handful of them two, three or four times before you get what you want. You might need to tweak prompts slightly based on what you are seeing.
4. Critical Insight: You Don’t Need the Entire Clip
This is extremely important: if the AI generates an 8-second video clip, you probably don’t need all 8 seconds.
The video looks amazing for the first 2-3 seconds, then something weird happens (the camera angle shifts awkwardly, elements transform strangely or the motion becomes unnatural).
Does this mean it’s a bad video? Not at all. You should judge each video not as one perfect 8-second clip but as a source of usable footage. Out of an 8-second generation, you might only use 1-2 seconds in your final edit.

VI. Step 4: Production – Stitching It All Together
You’ve generated all your video clips for your AI ads. Now it’s time to create your final polished product. Don’t worry, this doesn’t require advanced video editing skills. I’ll show you a simple approach anyone can follow.
1. Choosing Your Editing Platform
I use CapCut (the pro version, though the free version works too). Other options include DaVinci Resolve or Adobe Premiere. The principles remain the same across platforms.
2. The Key Concept: Audio-Driven Editing
The most important thing to understand is how you will transition from scene to scene. For most AI-generated ads, the audio track dictates scene transitions.
Step 1: Choose Your Audio Track
-
Find music that has a clear, pronounced beat or rhythm. The tempo and beat drops will determine when you switch from one scene to the next.
-
For example, if you use a track with piano keys marking the beat, each scene switch happens right on that piano strike. This creates a rhythmic, engaging viewing experience.
Step 2: Import Everything
Drag your downloaded video clips and your audio track into your editing software.
Step 3: Build Your Timeline
-
Drag your first video clip onto the timeline.
-
Add your audio track.
-
Trim your video clip to the exact length needed (often just 1-3 seconds).
-
Align the end of your clip with the beat in your audio.
-
Add your second video clip immediately after the first.
-
Trim it to align with the next beat.
-
Repeat for all remaining clips.

3. Simple Enhancements
You don’t need to go crazy with effects. Simple additions can elevate your video:
-
Text overlays for product names or taglines.
-
Fade transitions between certain scenes for dramatic effect.
-
Make color grading adjustments if needed for consistency.
Once you are satisfied, export your video (set resolution to 4K for maximum quality). That’s it. You now have a professional, cinematic AI-generated video ready to deploy.

VII. What Parts Of This Workflow Should You Automate (And Shouldn’t)?
Now, let’s address an important question: Can you automate this entire process for AI ads?
The short answer: You can automate parts of it but you absolutely should not try to automate everything end-to-end.
You can automate prompt generation, image requests and even trigger video generations. But you should never automate creative judgment. A human still has to decide which images, which clips and which timings actually look good.
Key takeaways
-
Good targets for automation: prompt scaffolding, batch image runs, basic pipeline steps.
-
Bad targets for automation: picking shots, judging style, deciding what feels on brand.
-
The starting frame and final cut always need human review.
-
Over-automation leads to fast output that nobody wants to watch.
Automation should handle repetition, not taste. You keep control over all decisions that affect how the ad feels.
1. What CAN Be Automated
-
Prompt Generation: You can build AI automation workflows (using tools like n8n) that take your scene description and automatically generate multiple prompt variations.
-
Image Generation Pipeline: You can create workflows that automatically feed prompts into Nano Banana Pro and generate images.
-
Basic Video Generation: Once you approve an image, automation can trigger the video generation process.

Here is an n8n workflow to automate creating images with Nano Banana Pro.
2. What SHOULD NOT Be Automated: The Creative Selection Process
Do not try to automate the selection and testing process, the part where you evaluate which images and videos to use. Here is why this will fail:
-
Testing changes is essential. You need to generate multiple variations and pick the best one. You need to see five different versions of a scene before you know which one captures your vision.
-
Everything depends on the starting frame. The image you choose determines the quality of your entire video. If you automate directly from image generation to video generation without human evaluation, you will build videos on weak foundations.
-
You don’t know what you want until you see it. Creative work requires judgment calls.
-
Video results vary wildly. Even with a great prompt, video generation might need 2-3 attempts to get right. Automation can’t evaluate quality the way a human can.

Regenerate ’til you find the best result.
The Golden Rule: Just because we can automate something doesn’t mean we should.
VIII. Conclusion: The Future of AI Content Creation
We’re at a point where one person can do what used to take a whole team. Tools like Nano Banana Pro and Veo 3.1 have turned weeks of production into hours, allowing one person to do the work of an entire team for AI ads.
But remember: creative judgment still matters. AI can handle the technical execution but your vision and taste are what make the final product connect.
The winners won’t be those who automate everything. They will be the ones who use AI to boost their creativity while staying in control of the details. The tools are ready. The workflow is proven for high-quality AI ads.
The only question is: What will you create?
If you are interested in other topics and how AI is transforming different aspects of our lives or even in making money using AI with more detailed, step-by-step guidance, you can find our other articles here:
-
Beginner’s Guide: Build Your First AI Voice Agent (With No Code)*
-
Stop Paying For AI! These 30+ Google Tools Are FREE
*indicates a premium content, if any
Leave a Reply