

STOP paying for cloud services. This is the complete, NO-CODE guide to installing a local AI on your computer for unlimited, private and 100% FREE voice cloning. Ai Tools, Ai Fire 101, Open Source, Ai Workflows.
Table of Contents
I. Introduction: The AI Revolution in Your Pocket
The voice you hear in your head as you read this might soon be one you can create with AI. AI voice cloning has reached a point where you can replicate virtually any voice – from your own to those of public figures – completely free, with unlimited usage, running entirely on your local machine.
This isn’t science fiction or some expensive, locked-down enterprise tool. This is technology that’s accessible to you right now. You can set this up in minutes, giving you the exact same voice cloning capabilities major YouTubers and content creators are already using to save hundreds of hours of recording time.
In this guide, I’m going to walk you through every single step. We’ll set up the software, install the AI model and clone your first voice.
II. Why Voice Cloning Matters (More Than You Think)
Before you dismiss this as too complicated or just a gimmick, I want you to understand the practical applications that are transforming how content gets made.
“The future is already here – it’s just not evenly distributed”. This guide is here to distribute it to you.
1. The Content Creation Revolution
This technology is a massive creative unlock. You can:
-
Create unique voices for viral content that needs to stand out.
-
Add professional-grade narration and depth to your story-driven videos.
-
Generate consistent narration across dozens of videos in a series, even if your own voice changes due to a cold.
2. The Workflow Automation Dream
This is where voice cloning gets really powerful for creators and businesses.
-
Clone your own voice to automate every single narration task.
-
Never record the same intro/outro again. Just type the new script.
-
Save hours each week on voiceover work.
-
Maintain a perfectly consistent voice across your entire content library, forever.
3. The Secret Many YouTubers Keep
Here’s something you should know: many of the successful creators you follow are already using voice cloning. They don’t manually record every single video anymore, especially for repetitive content. You probably never even noticed, because the technology has become that good.

Learn How to Make AI Work For You!
Transform your AI skills with the AI Fire Academy Premium Plan – FREE for 14 days! Gain instant access to 500+ AI workflows, advanced tutorials, exclusive case studies and unbeatable discounts. No risks, cancel anytime.
Start Your Free Trial Today >>
III. Legal & Safety: The Non-Negotiable Rules
Before we go one step further, we have to talk about the elephant in the room: the ethical and legal use of this technology. With great power comes great responsibility and this is a lot of power.
This is not a guide for doing illegal or harmful things. The tools themselves are neutral; how you use them is what matters.
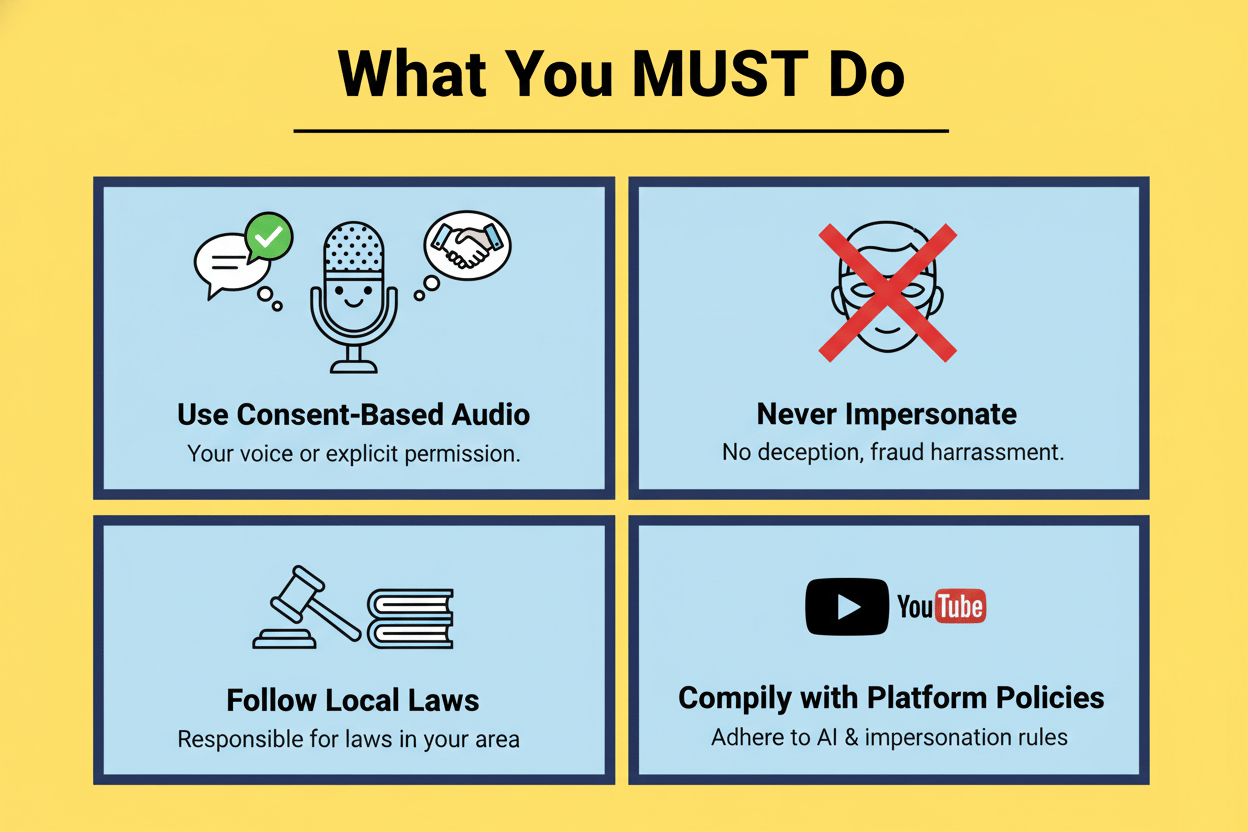
What You MUST Do
-
Use Consent-Based Audio: Only use your own voice or audio from someone who has given you explicit, verifiable permission to use it.
-
Never Impersonate: Do not use this to impersonate anyone for deception, fraud, harassment or to spread misinformation.
-
Follow Local Laws: You are responsible for following all laws in your area regarding voice synthesis, copyright and impersonation.
-
Comply with Platform Policies: YouTube and other platforms have strict AI and impersonation policies. Make sure you comply.
What This Guide Provides
This is for educational and legitimate creative purposes only. I’m providing:
-
Educational understanding of how this technology works.
-
Tools for legitimate personal use (like cloning your own voice for your own content).
-
Technical knowledge to understand AI’s capabilities.
-
Guidance on responsible implementation.
IV. The Complete Advantage: Why Local Matters
You might have seen cloud-based services that do this but this tutorial focuses on a local installation. This is a critical distinction and provides massive benefits over any online voice cloning tool.
-
1. Total Privacy Protection: Your voice, your audio files and your generated content never leave your computer. You aren’t uploading your biometric voice data to some mysterious website where you have no idea what happens to it.
-
2. Zero Cost, Unlimited Use: This is 100% free. There are no subscriptions, no token systems and no pay-per-use charges. Once it’s set up, you can use it as much as you want.
-
3. No Accounts Required: You don’t need to sign up for anything, give away your email or get locked into a vendor’s ecosystem.
-
4. Offline Capability: Once installed, the entire system works without an internet connection.
-
5. Full Control: You own and control the entire pipeline from start to finish.

V. Setting Up Pinokio: Your Local AI Platform
To run these powerful AI models locally, we first need a “command center”. Pinokio is a brilliant platform that lets you discover, install and run all kinds of AI tools on your own computer with a simple, one-click process.
Think of it as Steam but for AI models.
1. Installation Process
-
Step 1: Download Pinokio: Go to the official Pinokio website and click “Download”.

-
Step 2: Simple Installation: The download will be a standard installer for your operating system (Windows, Mac or Linux). Unzip the file and run the installer. Just follow the on-screen prompts like any other software.

-
Step 3: Initial Configuration: The first time you launch Pinokio, you’ll see a welcome screen. It shows you the version and where it will install your AI model files.
You can also select a theme (I recommend dark mode for comfort). Just click “Save” and you’ll land on Pinokio’s main page. It will be empty for now but we’re about to fix that.

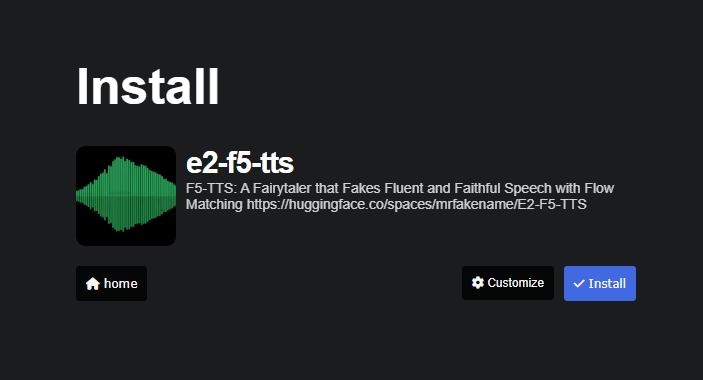
2. Installing the E2-F5-TTS Voice Cloning Model
The specific model we’re using is called E2-F5-TTS. This is a powerful, open-source voice cloning system that Pinokio makes incredibly easy to install.
-
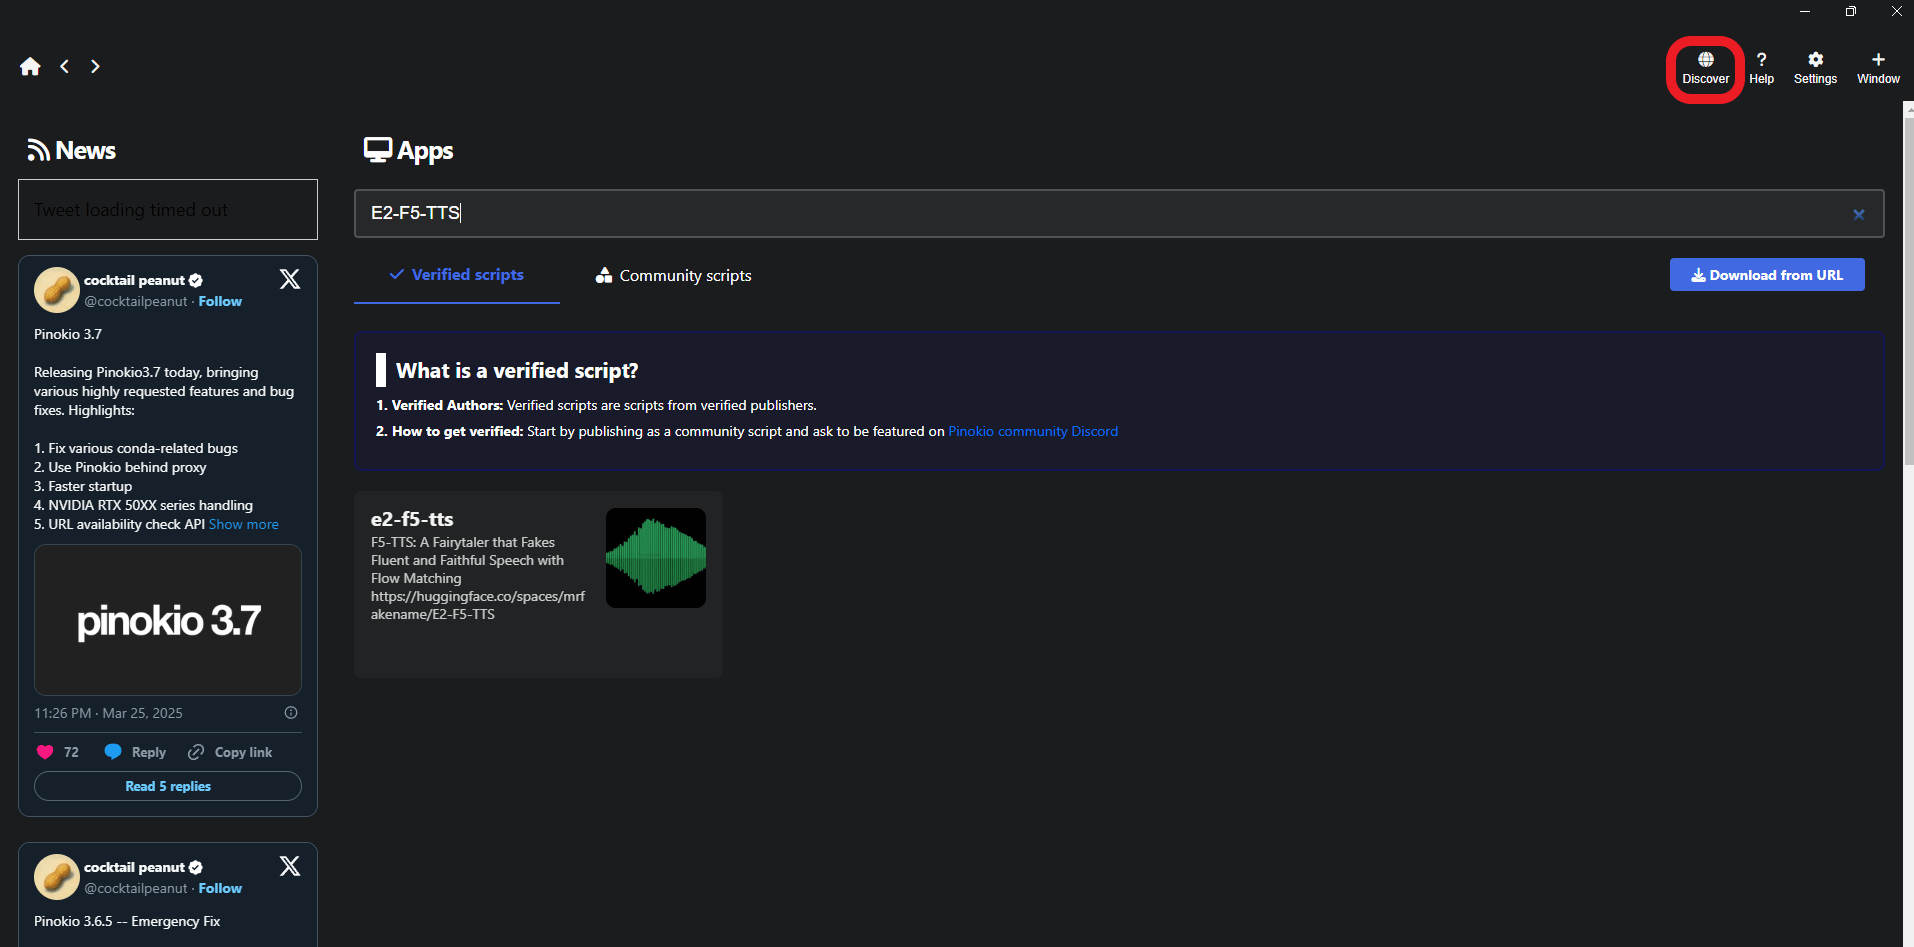
Step 1: Discover Available Models: Click the “Discover” button on the Pinokio home page. You’ll see a huge list of locally installable AI models.
-
Step 2: Find and Install: In the search bar, type “E2-F5-TTS”. Click on it.
-
Step 3: One-Click Installation: You’ll see a page describing the model. Just click the “One-Click Install with Pinokio” button. It will show you a list of all the dependencies (the other software it needs) and then you just click “Install”.

-
CRITICAL Installation Rules:
-
Don’t touch anything. Just let the installer run.
-
A “Save As” window will pop up. This is Pinokio downloading the model. Just click “Download” and let it finish.
-
When it’s done, it will prompt you to “Install”. Click it.
-
Be patient. Pinokio is doing all the complicated work for you – downloading the model files, all the code libraries and configuring everything. This might take a few minutes depending on your internet speed but you only have to do it once.
-


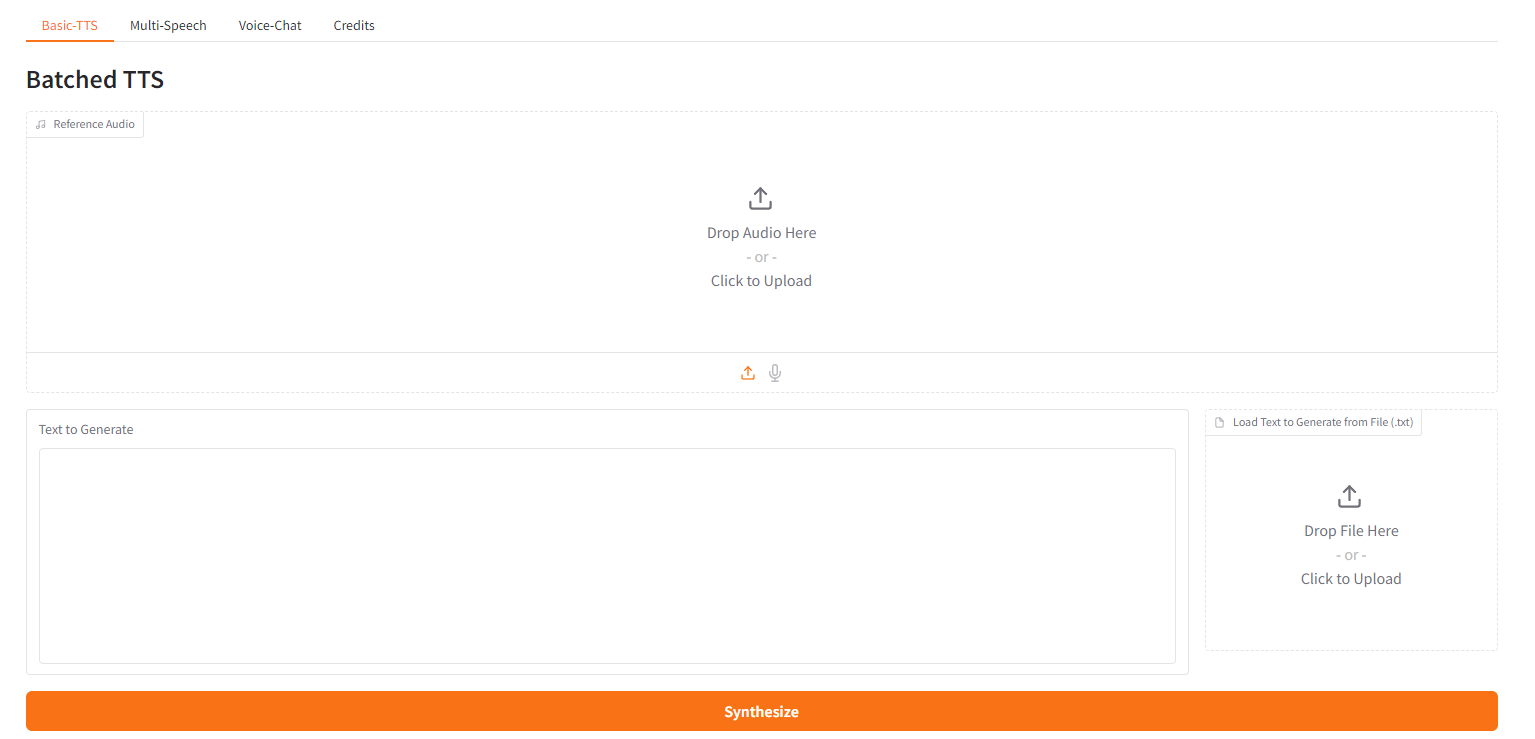
VI. The E2-F5-TTS Interface: Your Cloning Cockpit
Once the installation is complete, you’ll see the E2-F5-TTS interface. This is your “cockpit” for cloning voices. Let’s get familiar with the controls.
1. Model Selection
At the top, you’ll see a dropdown for “Model Selection”. The default, F5-TTS_V1, should already be selected. This is the one we’ll use for all our cloning.

2. Operating Modes
You’ll see a few tabs:
-
Basic TTS (Recommended): This is for generating a single voice with the highest possible quality. This is what you should use 99% of the time.
-
Multi-Speech: This mode lets you generate multiple voices in one file (like a conversation). It’s a cool feature but in my testing, the quality is lower.
-
Voice Chat: For real-time conversation capabilities (a more advanced feature).
-
Credits: Shows the attribution and licensing information for the open-source model.
Expert Tip: After many tests, I can tell you that Basic TTS produces vastly superior results. If you need multiple voices for a podcast or video, just generate each voice separately in Basic TTS mode and stitch them together in an audio editor. The final quality is worth the extra 30 seconds of work.
VII. The Reference Audio: Your Voice Source
This is the most critical component of the entire process. The “Reference Audio” is the audio sample that the AI will learn from and replicate. The quality of your final clone is 100% dependent on the quality of this source file.
Clean input = clean output.
1. How to Capture Reference Audio
You have two easy methods to get your voice into the system.
-
Method 1: Upload an Audio File. If you already have a high-quality recording of your voice (or the voice you have permission to use), this is the best way.
-
If your file is a video (like an old YouTube video), use an online “video to MP3” converter.
-
In the “Reference Audio” section of the app, just upload your audio file.
-

-
Method 2: Record Live in the App. If you want to clone your voice right now, this is the fastest way.
-
Check the “Microphone” button.
-
Select your input device (your mic) from the dropdown.
-
Click the “Record” button.
-
Speak clearly into your microphone.
-
Click “Stop” when you’re done.
-

2. Best Practices for Recording
To get a high-quality clone, you must give the AI a clean sample.
-
Eliminate Background Noise: Record in a quiet room. No fans, no air conditioning, no street noise.
-
Speak Naturally: Use your normal, conversational tone. Don’t put on a “radio voice”.
-
Get Enough Data: You need at least 10-15 seconds of clear speech for the AI to get a good lock on your voice. More is often better, up to about a minute.
-
No Music: Your reference audio must be only your voice. No music, no sound effects, no other people speaking.

VIII. Creating Your First Voice Clone: Step-by-Step
Let’s walk through the complete process of generating your first piece of AI-cloned audio.
Step 1: Prepare Your Text
In the “Text to Generate” box, write exactly what you want the cloned voice to say. How you format this text matters.
-
Use Clear Language: Keep your sentences concise and natural.
-
Punctuation is Key: The AI actually reads your punctuation to understand tone and pacing. A question mark (?) will make the voice go up at the end. An exclamation mark (!) will add energy.
-
Example Good Text: “Welcome to our channel! Today we’re exploring something incredible. Are you ready?”
-
Example Poor Text: “welcome to our channel today were exploring something incredible are you ready” (This will sound flat and robotic).

Step 2: Configure Advanced Settings (The Pro Move)
Click the “Advanced Settings” toggle. This opens a panel with controls that most people ignore but these are the settings that take your audio from “good” to “flawless”.
-
Seed Control (The “Consistency” Dial):
-
As you generate audio, the AI will match the timbre of your voice but the tone (inflection, emotion) can vary.
-
When you generate a version you really like, save the “seed” number (e.g.,
12345). -
Disable the “Random Seeds” checkbox.
-
Enter your saved seed number.
-
Why this is magic: Now, every time you generate audio with this seed, the AI will use the exact same emotional tone and inflection. This is essential for getting consistent results across multiple recording sessions.
-
-
Remove Silences:
-
If your generated voice has too many long, awkward pauses, enable this option.
-
It automatically trims the dead air, making the narration more dynamic and “punchy”. This is essential for most YouTube and social media content.
-
When not to use it: If you want a more contemplative, dramatic or “storytelling” pace, leave this off.
-
-
Speed Adjustment:
-
This lets you fine-tune the playback speed.
-
Adjust it in small increments (e.g.,
1.05or1.1) until you find the perfect, natural-sounding pace for your content.
-
-
Other Settings: You can safely leave the remaining options at their default values. These three are the ones that deliver 90% of the quality improvement.

Step 3: Generate and Test
You’re all set.
-
Check that your reference audio is loaded.
-
Check that your text is written and punctuated correctly.
-
Check that your advanced settings (Seed, Silences, Speed) are configured.
-
Click “Synthesize”.
It will usually take 5-30 seconds to generate the audio. Listen to it. Is it perfect? Probably not on the first try. Voice cloning is an iterative process. Listen, evaluate, adjust the settings (maybe change the speed from 1.1 to 1.05) and generate again. Small changes can lead to dramatically better results.

Creating quality AI content takes serious research time ☕️ Your coffee fund helps me read whitepapers, test new tools and interview experts so you get the real story. Skip the fluff – get insights that help you understand what’s actually happening in AI. Support quality over quantity here!
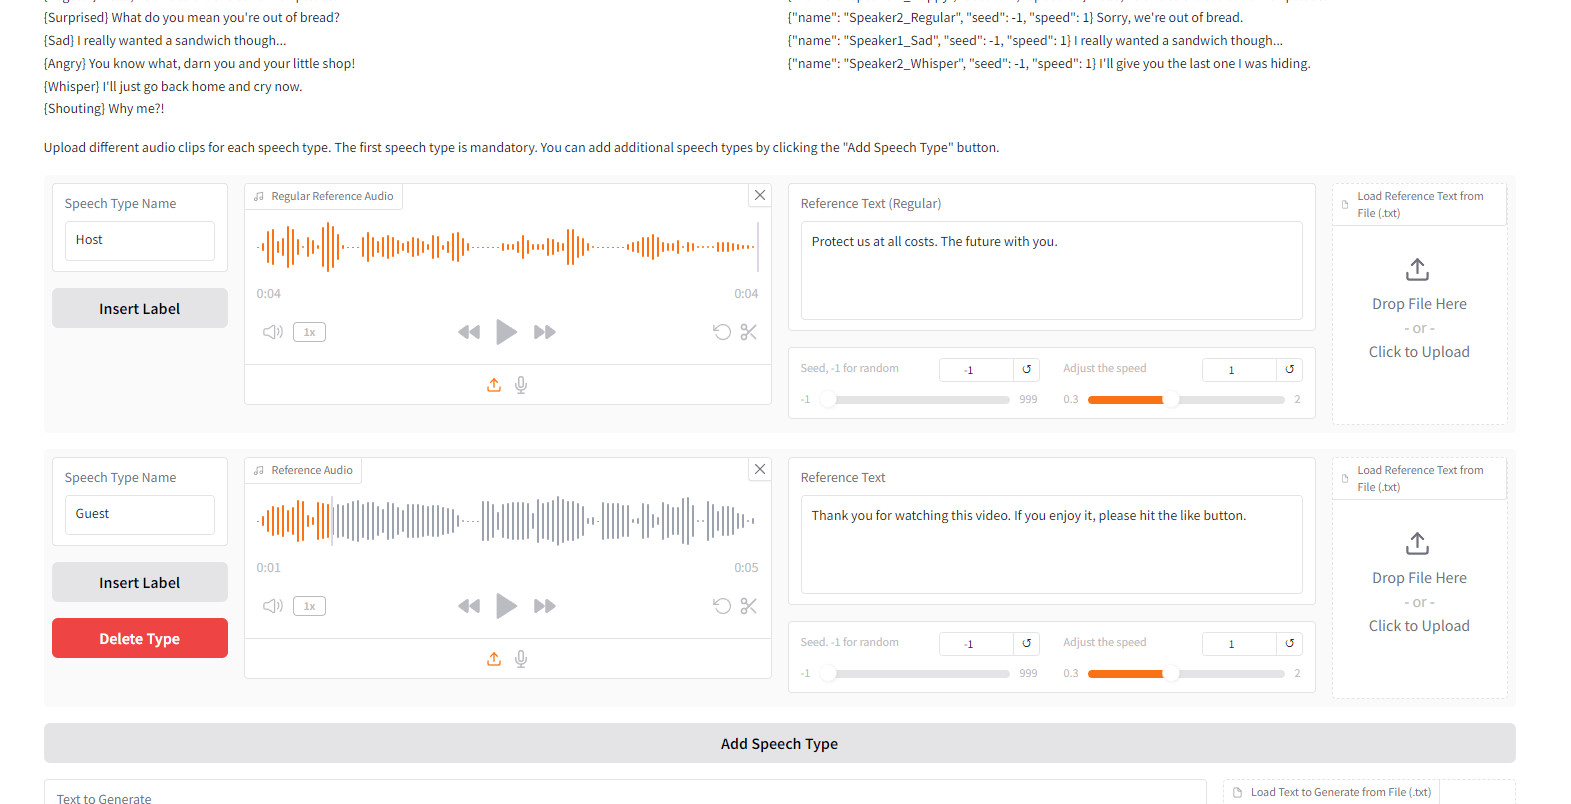
IX. Advanced Feature: Multi-Speaker Conversations
What if you want to create a podcast or a dialogue between two different voices? You can use the “Multi-Speech” mode.
-
Step 1: Define Speaker 1:
-
In “Speech Type Name”, enter a name (e.g., “Host”).
-
Upload the reference audio for the host.
-
Write their text in the text box.
-
Click “Add Speech Type”.
-
-
Step 2: Define Speaker 2:
-
Enter a different name (e.g., “Guest”).
-
Upload the different reference audio for the guest.
-
Write their text.
-
Click “Add Speech Type”.
-
-
Step 3: Script the Conversation:
In the “Text to Generate General” box, you format your script using the names you just defined:
{Host} Welcome to the show!
{Guest} Thanks for having me!
{Host} Let's dive into today's topic.
{Guest} I'm excited to discuss this.
Quality Consideration: As I mentioned earlier, this mode works but the Basic TTS mode delivers superior quality. For important projects, I strongly recommend generating each speaker’s lines separately in Basic TTS and then combining them in an audio editor.

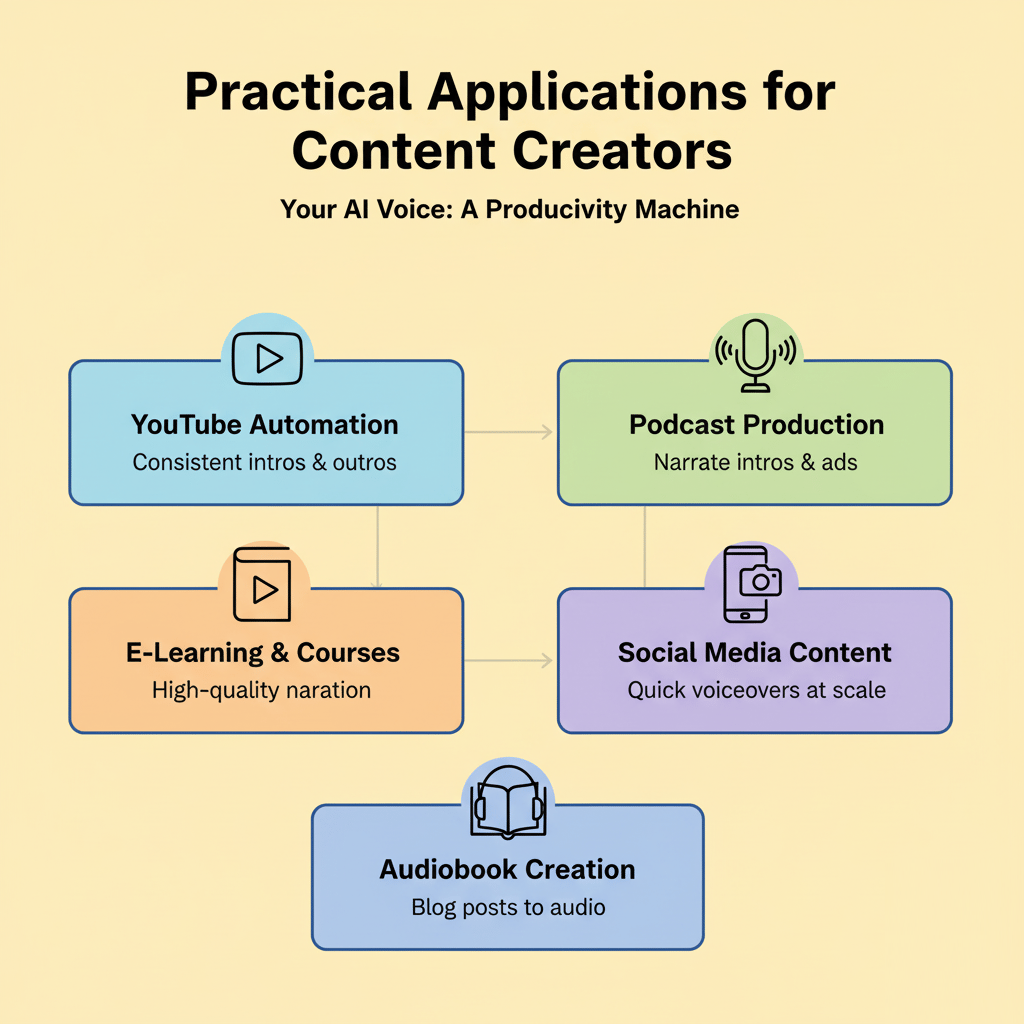
X. Practical Applications for Content Creators
This technology isn’t just a toy; it’s a productivity machine.
-
YouTube Automation: Clone your voice once. Now you can use it for consistent intros, outros and ad-reads across all your videos without ever having to re-record them.
-
Podcast Production: Generate narration for your intro segments, sponsored messages or summary sections.
-
E-Learning & Courses: Create 10+ hours of high-quality course narration without the vocal fatigue of recording it all in one sitting.
-
Audiobook Creation: Turn your blog posts or ebooks into audiobooks in your own voice without needing a studio.
-
Social Media Content: Create quick, punchy voiceovers for dozens of Reels, TikToks and Shorts at scale.
XI. Troubleshooting Common Issues
You might hit a few snags. Here are the most common problems and their solutions.
-
Problem: The generated voice sounds robotic or unnatural.
Solution: Your reference audio is the problem. Re-record it in a quieter room, with no background noise and make sure you’re speaking naturally. Also, try the “Speed” setting – a slight adjustment can make it sound much more human.
-
Problem: The tone doesn’t match my reference.
Solution: You need to find the right Seed. Generate a few times until you get a tone you like, then lock in that seed number.
-
Problem: There are too many awkward pauses in the audio.
Solution: Check the “Remove Silences” box in the advanced settings.
-
Problem: The installation failed or I’m getting errors.
Solution: You likely interrupted the installation. Delete the model from Pinokio and reinstall it, letting it run completely uninterrupted until it’s 100% finished.
You can save the image below to help you remember.

Conclusion: With Great Power…
This tutorial shows you how to use voice cloning technology that is simultaneously empowering and, let’s be honest, potentially problematic. The tools themselves are neutral. Your usage is what determines their impact.
|
Category |
Use Cases to Embrace ✅ |
Use Cases to Avoid 🚫 |
|---|---|---|
|
Purpose |
Enhance your own content and automate workflows for productivity. |
Impersonating others, including celebrities, without explicit permission. |
|
Creativity |
Saving time on legitimate, creative projects that add real value. |
Creating deceptive or misleading content, such as deepfakes or misinformation. |
|
Accessibility |
Producing more accessible content for your audience (captions, translations, summaries). |
Engaging in fraud, harassment or any unethical manipulation. |
|
Education |
Using AI for teaching or demonstrations, showing safe, transparent applications. |
Violating platform policies or laws within your jurisdiction. |
The AI revolution in content creation is here. You now have the knowledge to use it effectively and, most importantly, responsibly.
If you are interested in other topics and how AI is transforming different aspects of our lives or even in making money using AI with more detailed, step-by-step guidance, you can find our other articles here:
-
Stop Building n8n AI Agents Manually! THIS Does It For You*
*indicates a premium content, if any
Leave a Reply