
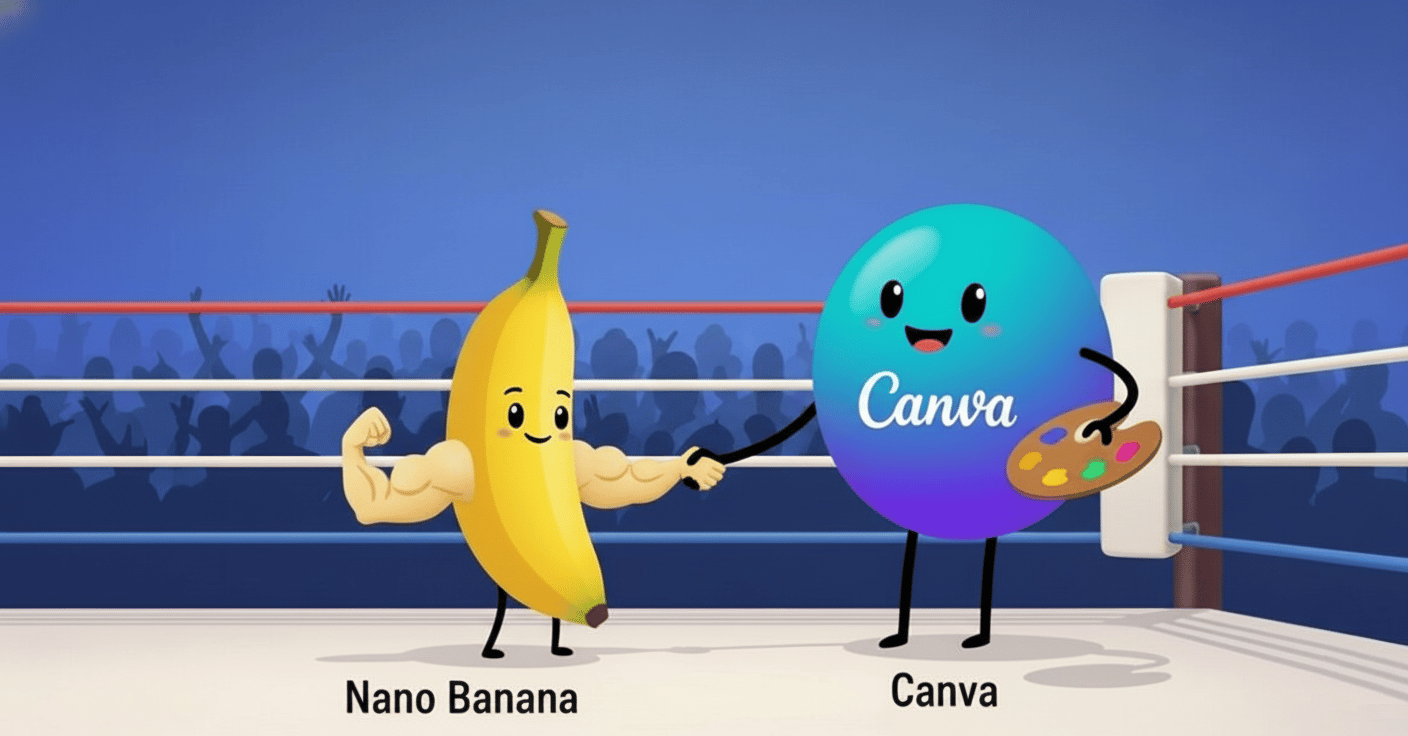
Stop writing complex prompts. This simple no-code workflow combines Canva’s visual markup with Nano Banana’s AI power to get flawless, precise edits on the first try. Ai Tools, Ai Fire 101, Ai Workflows.
Table of Contents
I. Introduction: The AI Editing Problem
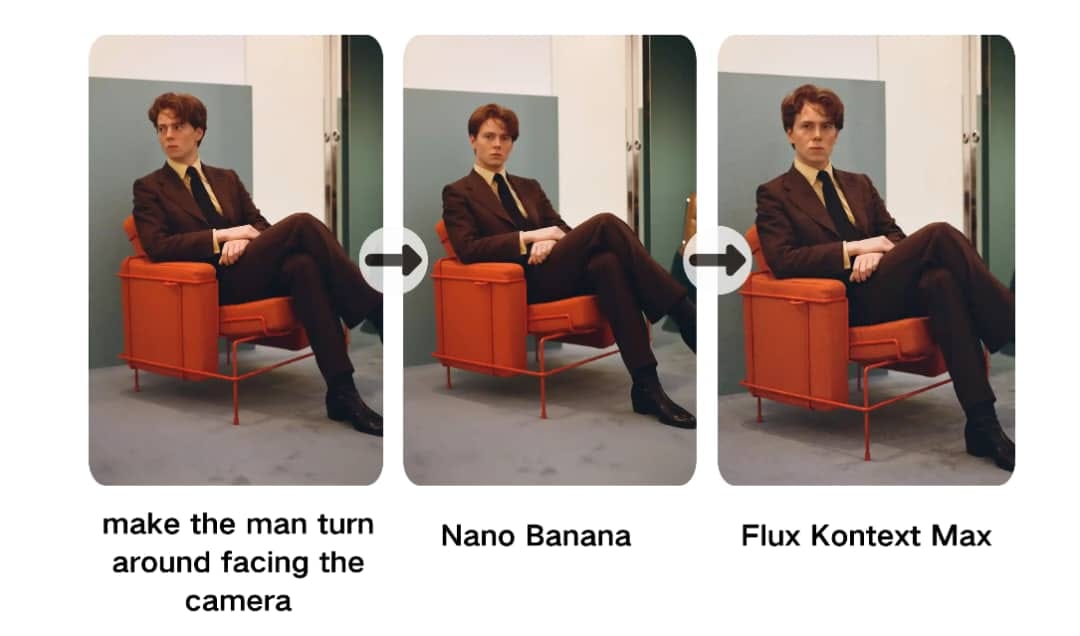
Let’s be honest, AI image editing can be magical but it’s also incredibly frustrating. I’m talking about Google’s Nano Banana – the powerhouse image model built into Gemini 2.5 Flash Image. It can be amazing… when it works. But if you’ve used it, you know the pain.
You try to change a person’s shirt and it changes the sky. You ask to edit one object and it stubbornly modifies something else entirely. The technology is brilliant but it just doesn’t seem to listen. You’re left trying to explain where your edit should go and the AI just gets confused. It’s like trying to guide a talented artist who’s wearing a blindfold.
After a lot of testing, I’ve found a simple workflow that solves this problem completely. It combines Canva’s simple design tools with Nano Banana’s AI power. No more complex prompts. No more iterating 10 times, hoping the AI finally understands you. This is a straightforward visual approach that makes Nano Banana edit exactly what you want, exactly where you want it – every single time.
This technique doesn’t just save time. It completely changes how you interact with AI image editing. It transforms a frustrating, trial-and-error guessing game into a precise, predictable and powerful workflow that puts you back in complete control of your AI design tool.
II. The Nano Banana Problem: When Great Technology Doesn’t Listen
So, to understand why the Canva fix is so smart, we first need to understand what makes Nano Banana so good and also so frustrating. This model, which is part of Google’s Gemini 2.5 Flash Image, is a huge leap forward in AI image generation. From my experience, here’s what it does really, really well:
1. Character Consistency
This is perhaps Nano Banana’s most impressive skill. In the past, if you asked an AI to generate an image of a character and then asked for a modification, it would give you back a completely different-looking person. Nano Banana is fantastic at keeping facial features, clothing details and other identifying features consistent across many edits. This is a breakthrough for creative projects.
Learn How to Make AI Work For You!
Transform your AI skills with the AI Fire Academy Premium Plan – FREE for 14 days! Gain instant access to 500+ AI workflows, advanced tutorials, exclusive case studies and unbeatable discounts. No risks, cancel anytime.
Start Your Free Trial Today >>
2. Natural Language Understanding
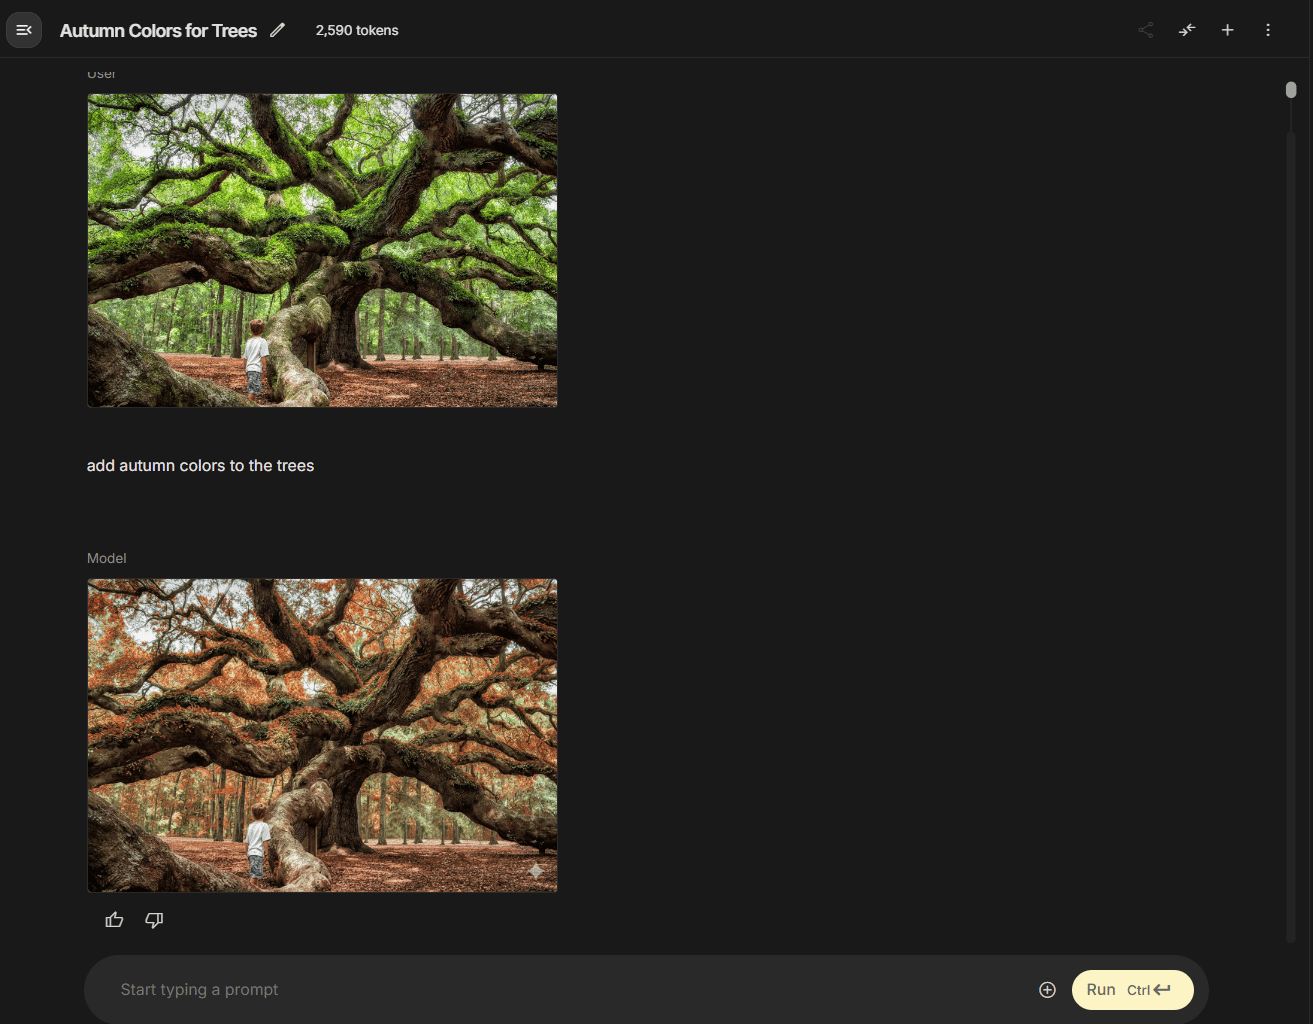
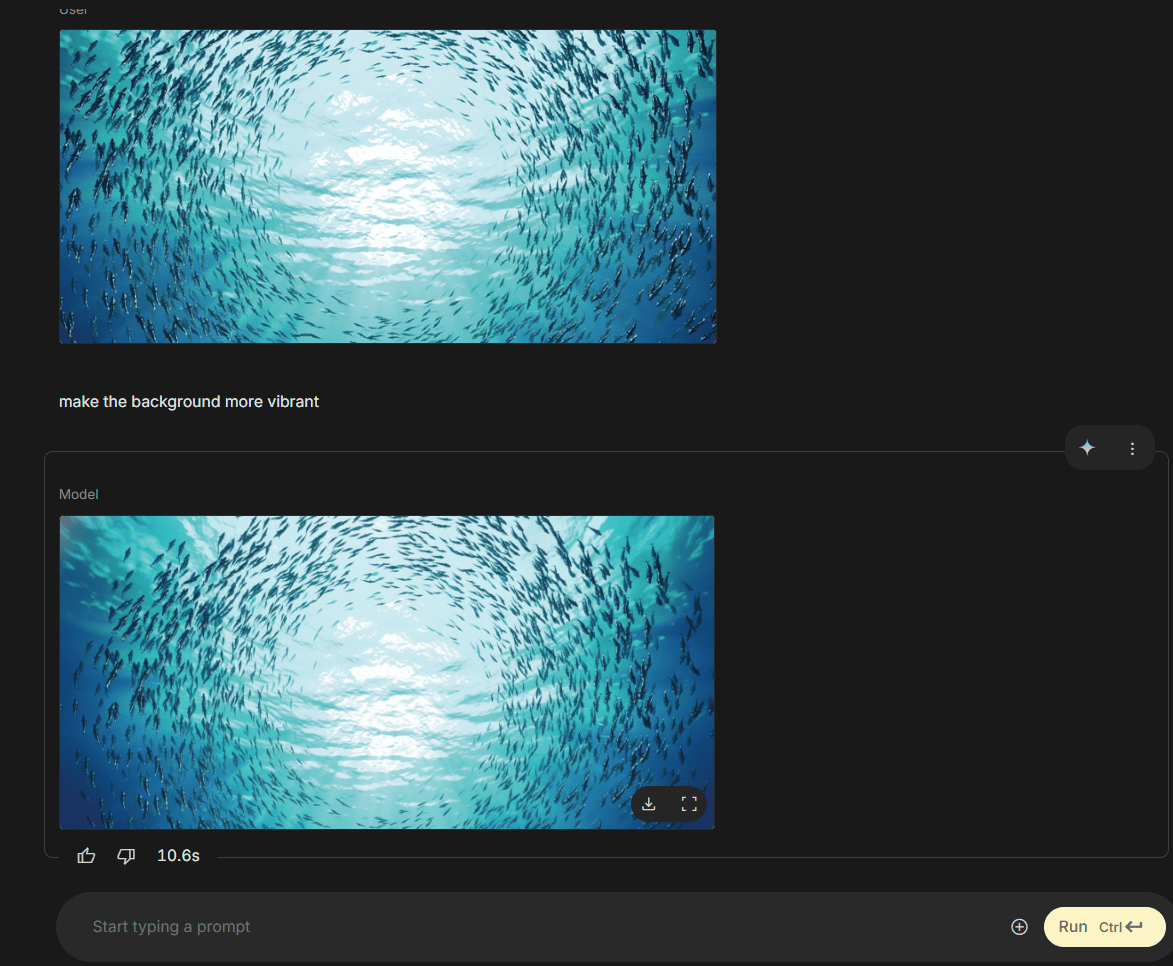
It’s great at understanding difficult instructions that are said in a normal, natural way. You don’t have to use weird technical code or commands. You can just say, “make the background more vibrant” or “add autumn colors to the trees” and it understands what you want to create.
3. Speed and Accessibility
Nano Banana is fast, generating high-quality images in seconds. It’s also integrated directly into Google’s Gemini interface, so you don’t need separate accounts, API keys or special payments (at least, on the free tier). This combination makes it incredibly practical for daily use.
4. Multi-Modal Editing
This is a key feature: it can combine your text instructions with reference images. You can do advanced edits like, “make this photo look like this reference image” or “match the lighting in this example”. It can generate from scratch, edit existing images or blend multiple inputs.

The Fundamental Flaw: It Gets Lost
Despite all these strengths, Nano Banana suffers from a basic limitation: spatial ambiguity. It gets confused about where you want your edit to happen.
When you give it a text instruction like, “Change the color of the shirt to blue”, the AI has to guess:
-
Which shirt do you mean (if there are multiple people)?
-
Which part of the image contains that shirt?
-
What are the exact edges of the “shirt” versus the background, the person’s skin or their hair?
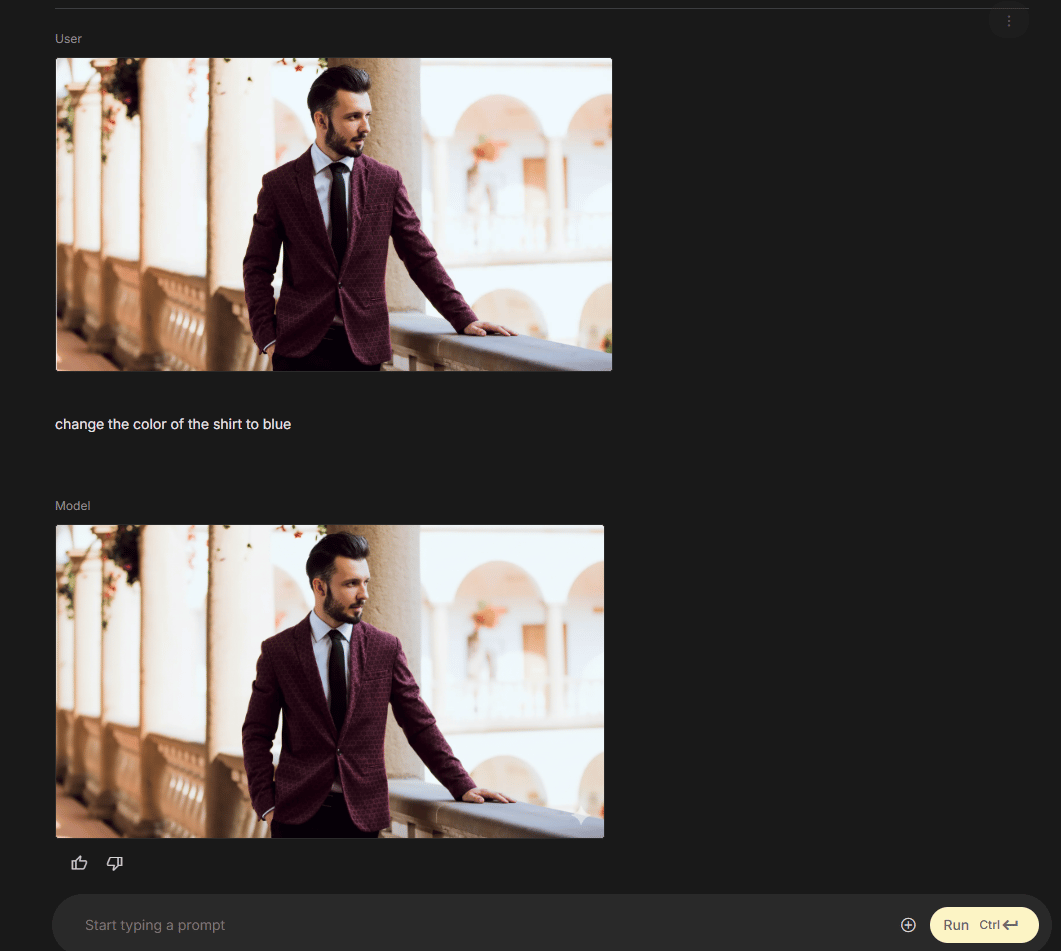
This interpretation process fails all the time. I’ve had it happen more times than I can count. You ask to modify the sky and it also changes the ground. You request a change to the object on the left and it edits the one on the right. This gets worse as your image gets more complex.
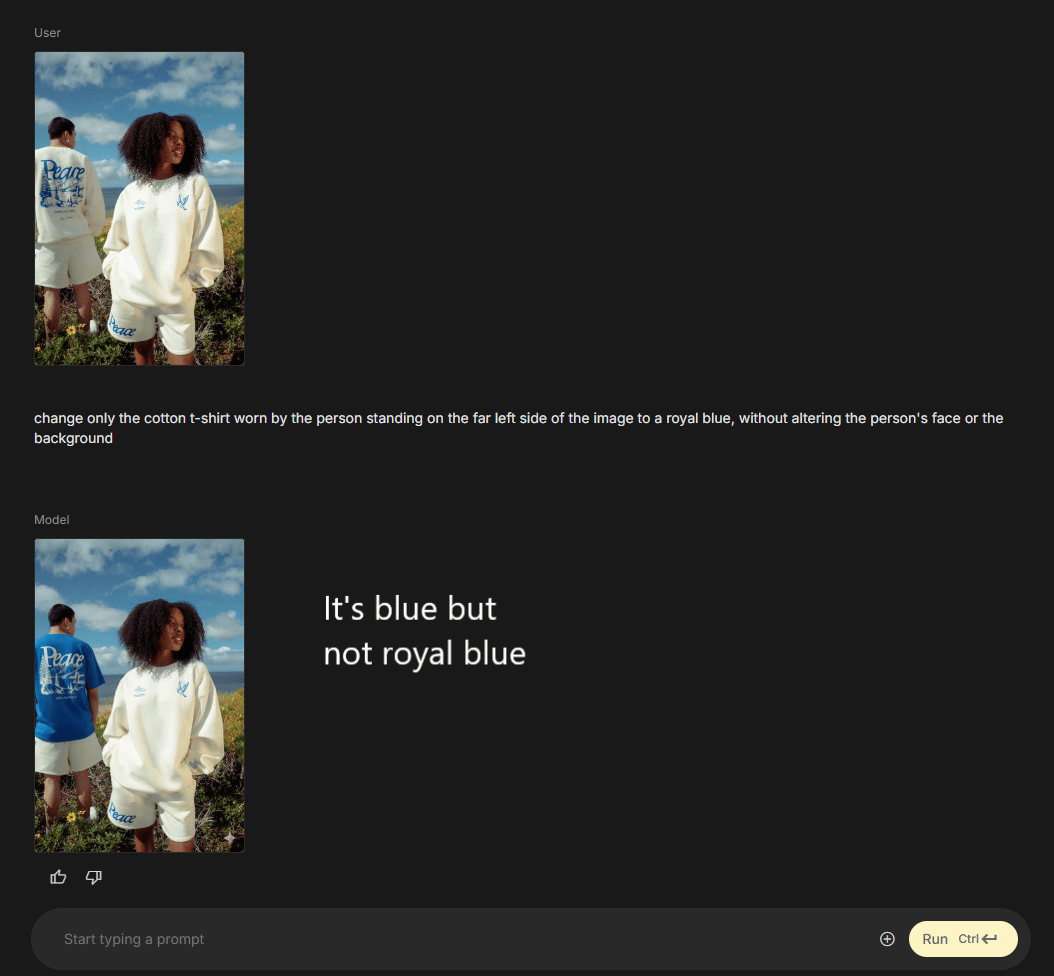
You can try to fix this with “prompt engineering”, making your prompts ridiculously specific: “change only the cotton t-shirt worn by the person standing on the far left side of the image to a royal blue, without altering the person’s face or the background”. Sometimes this works. Often, it still fails. You end up spending more time writing a legal document of a prompt than it would have taken to just do the edit in Photoshop.
The frustration comes from a basic mismatch:
-
Humans think visually: “I want to change this specific thing right here“. (We point with our finger or mouse).
-
AI thinks textually: “Based on this string of words, which pixels are statistically most likely to be the ‘shirt’?”
It’s a “failure to communicate”. And it’s not your fault. No matter how advanced the model, trying to describe an exact visual location using only words is just the wrong tool for the job.
III. The Canva Solution: Visual Instructions for Visual Tasks
The breakthrough insight for solving this is almost embarrassingly simple. Instead of describing where you want your edits using words, you show Nano Banana where you want the edits using visual markers.
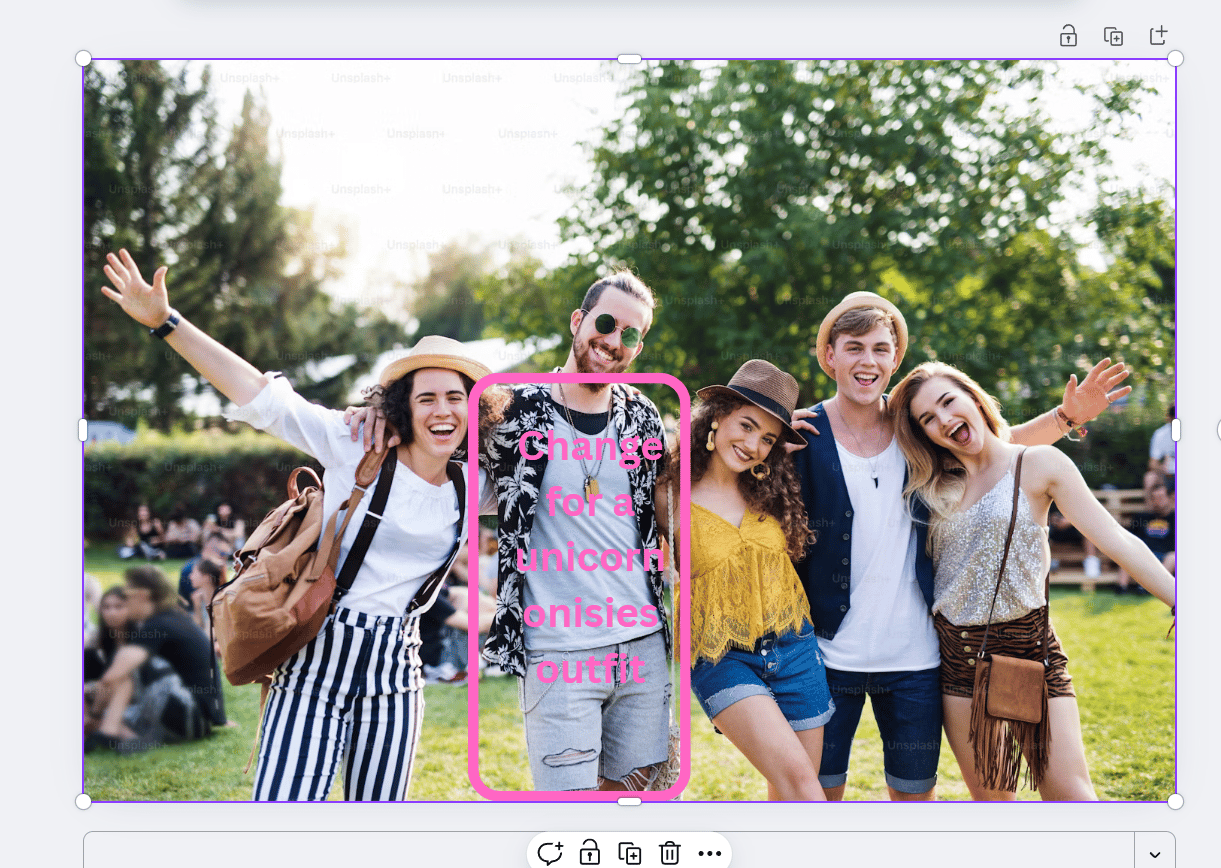
This is where Canva, a simple design tool, becomes the bridge between your visual brain and the AI’s text brain. You use Canva’s super-simple design tools to mark up your image with visual instructions – think bright pink rectangles highlighting the edit regions and text boxes explaining the desired changes.
Then, you feed this “marked-up” image to Nano Banana with a simple, universal prompt that basically says, “follow the instructions in this image”.
This approach fully uses Nano Banana’s multi-modal capabilities (its power to understand both text and images at the same time). It completely bypasses its greatest weakness (interpreting locations from text). You’re no longer asking it to guess where the shirt is; you’re drawing a giant pink box around it and saying, “Here is the shirt”.
The result is editing accuracy that text prompts simply cannot match. I’ve tested this workflow extensively and it consistently produces accurate, predictable results on the first try – results that would have taken me five or ten frustrating attempts with text-only prompts.
IV. Step-by-Step: The Canva-to-Nano-Banana Workflow
Here is the complete process. It looks like a lot of steps but once you’ve done it twice, you’ll be able to do the whole thing in less than a minute. “I can do this all day”.
1. Open Your Image in Canva
First, get your starting image into Canva. You can just drag and drop the image file directly onto the Canva home page or upload it into a new blank canvas. This works with any standard image format (JPEG, PNG, etc.).
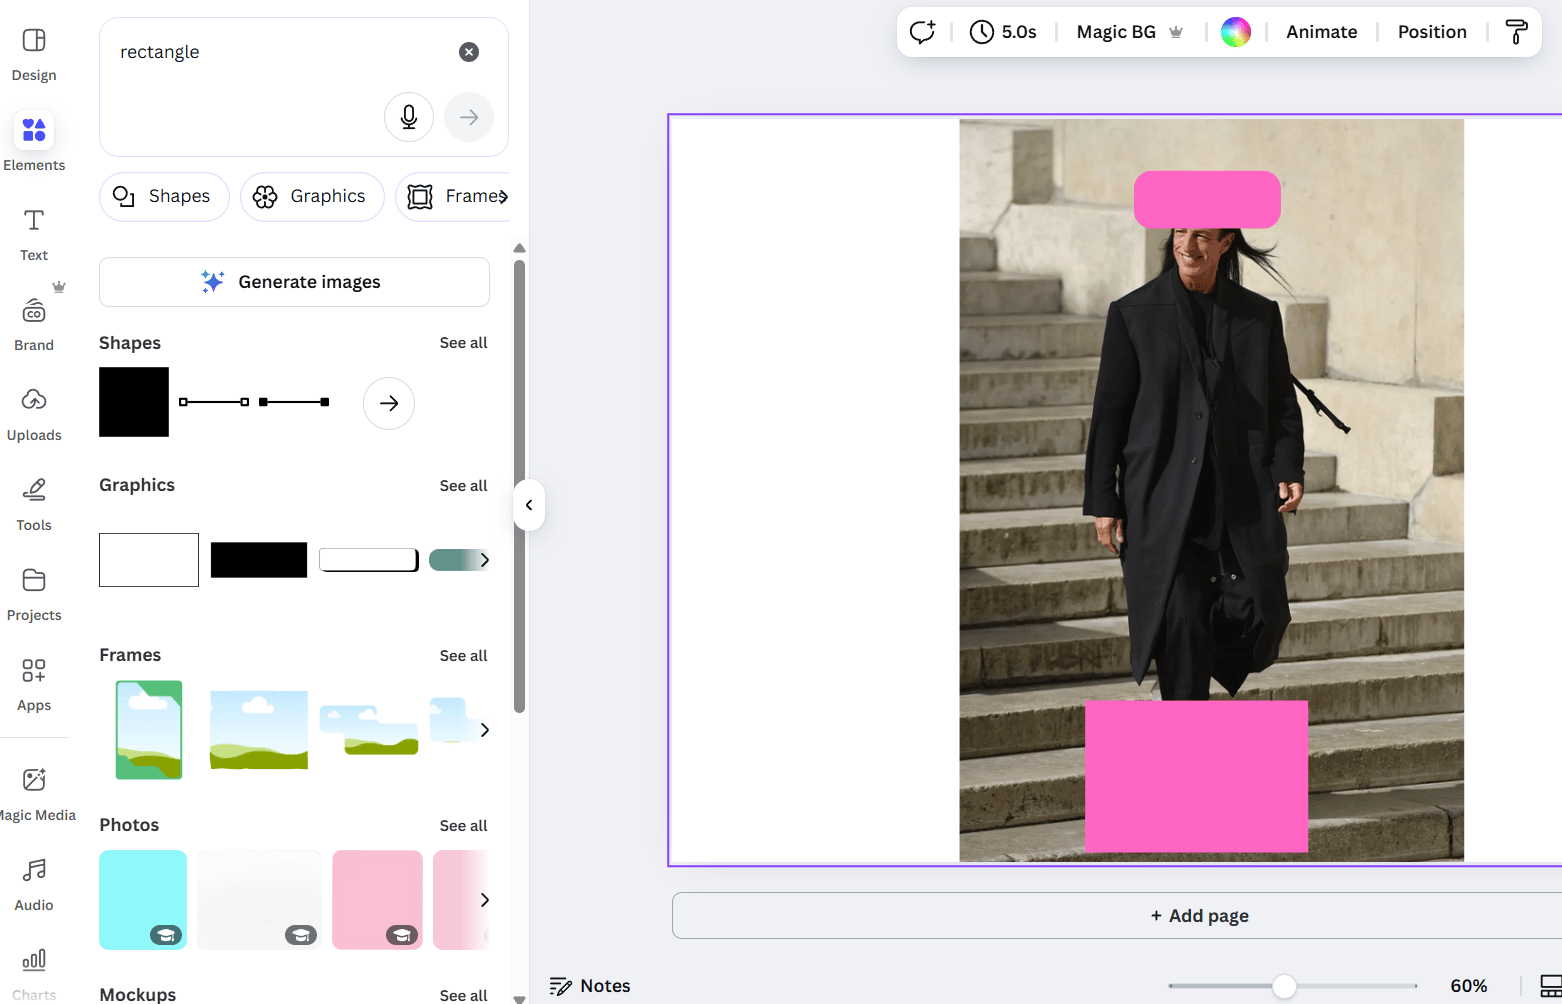
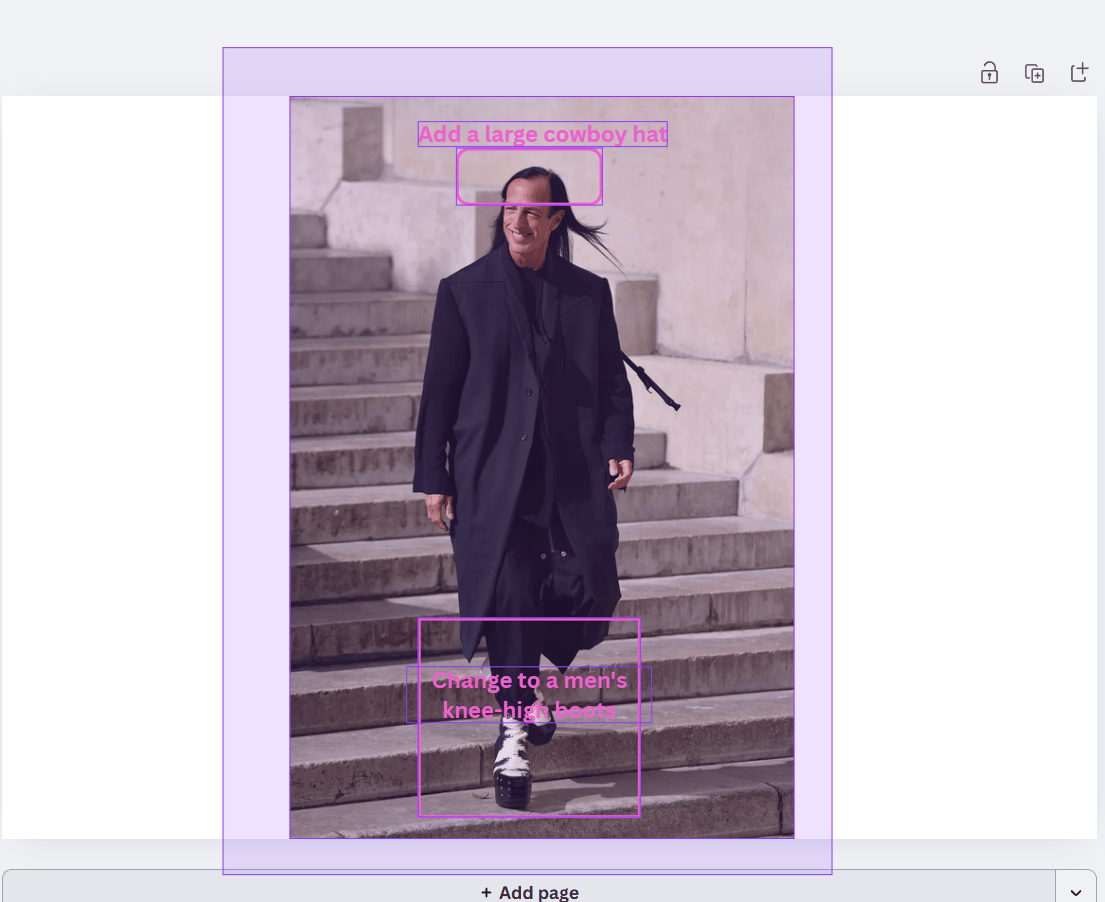
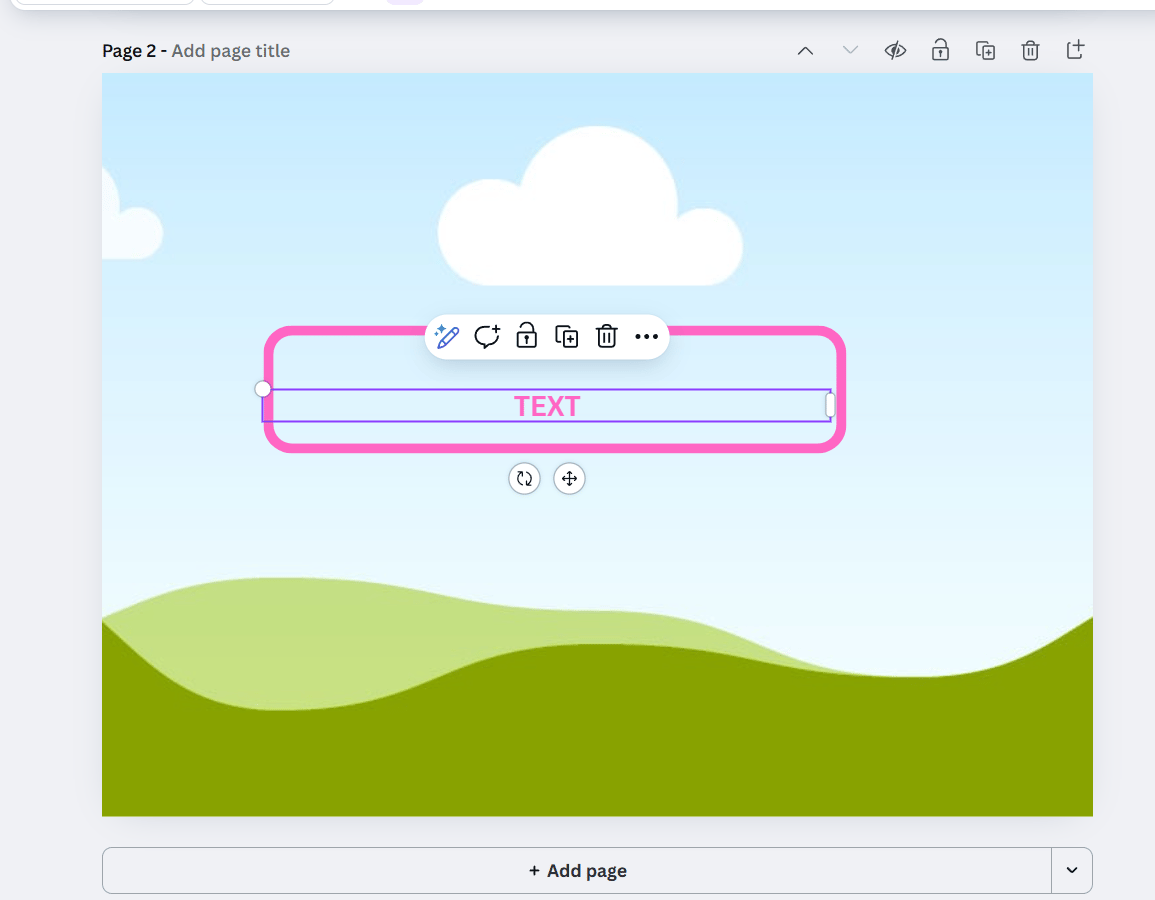
2. Draw Rectangles to Highlight Edit Regions
This is the magic part.
-
On your keyboard, press the R key. (This is the keyboard shortcut for the rectangle design tool).
-
A rectangle will appear on your image. Drag it and resize it to draw a box around the specific area you want Nano Banana to modify.
-
Be reasonably precise. Outline the object, person or background region. It doesn’t need to be pixel-perfect; the AI is smart enough to understand “the thing inside this box”.
-
If you want to edit multiple areas, just press R again to create more boxes.
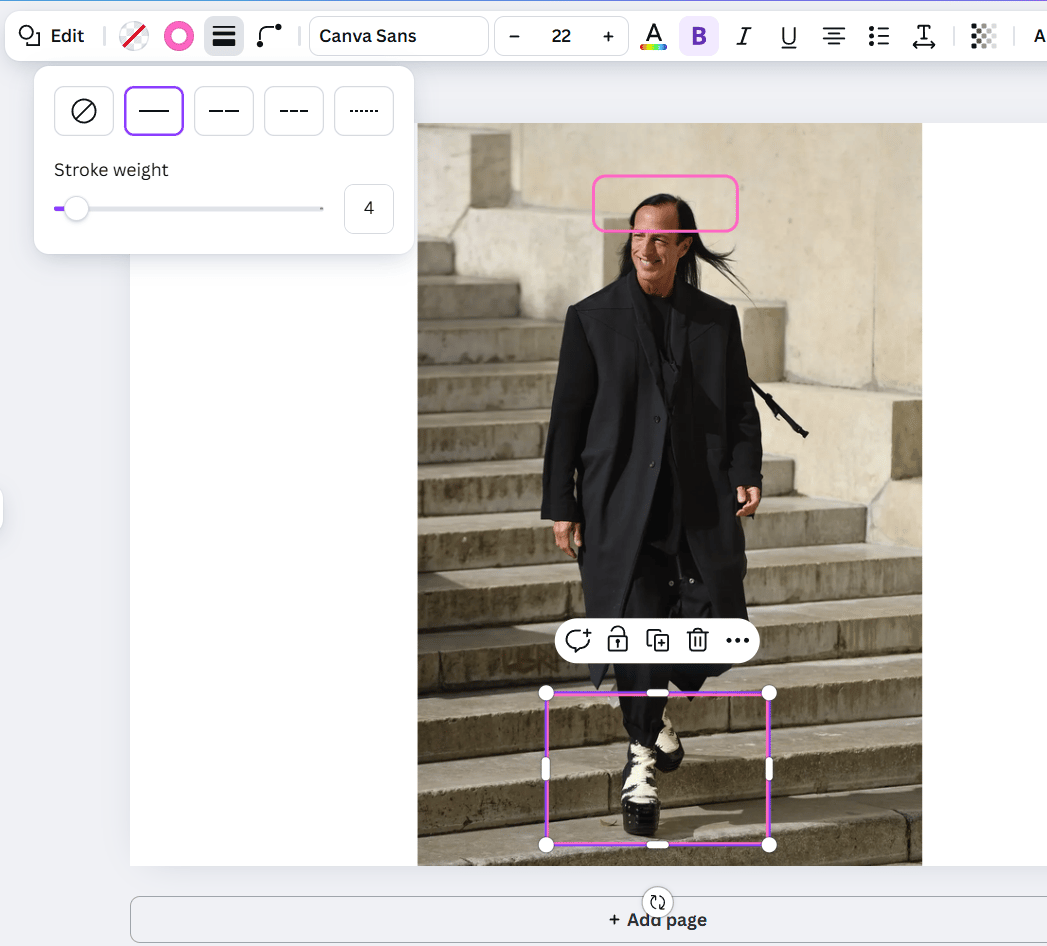
3. Format Rectangles: The “AI Signal”
This step is crucial. You need to format your boxes so the AI can see your markup and the image content underneath.
-
Select your rectangle.
-
In the toolbar, change the fill color to transparent (the white box with a red slash through it).
-
Next, click the border style icon. Set the border color to a bright, vivid pink.
-
Finally, increase the border width (thickness) to make it clearly visible (3-5 pixels usually works great).
Why pink? It’s simple: bright pink provides high contrast and stands out against most image content, making it an unmissable signal for the AI.
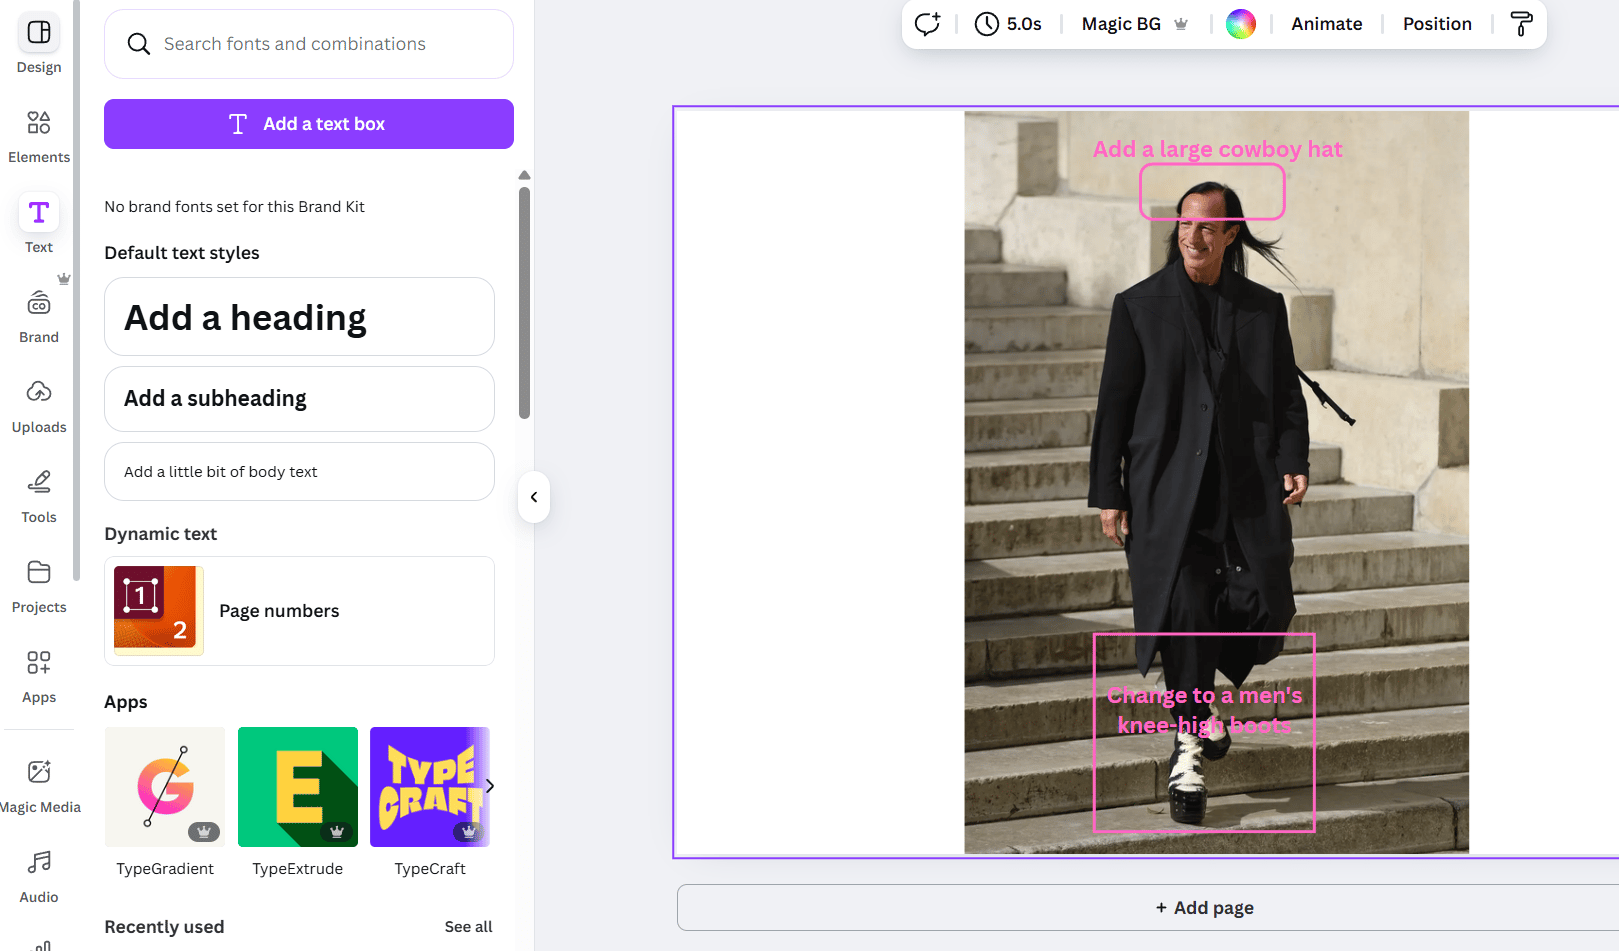
4. Add Text Instructions for Each Region
Now you tell the AI what to do in each box.
-
On your keyboard, press the T key. (This is the shortcut for the text design tool).
-
A text box will appear. Type your clear, concise instructions for what you want to be changed inside the nearby pink box.
-
Good examples:
-
“Change shirt color to a deep red”.
-
“Remove this person entirely”.
-
“Make this background blurry (bokeh effect)”.
-
“Add autumn leaves and colors to these trees”.
-
“Change the lighting in this area to be nighttime”.
-
-
You don’t need complex, essay-length prompts because the location problem is already solved.
-
Move the text box so it’s clearly next to its matching pink rectangle. If you have multiple edits, you can even number them: “1. Change sky to sunset colors” and “2. Make this water more reflective”.
5. Select All Your Markup
This is a quick but important step. You need to select all the pieces you’ve added.
-
Click and drag your mouse to draw a selection box around your original image, all the pink rectangles and all the text instruction boxes.
-
Alternatively, you can click each element one by one while holding the Shift key.
-
-
Check: Make sure everything is selected. If you miss an element, it won’t be included in the downloaded image and the AI will get incomplete instructions.
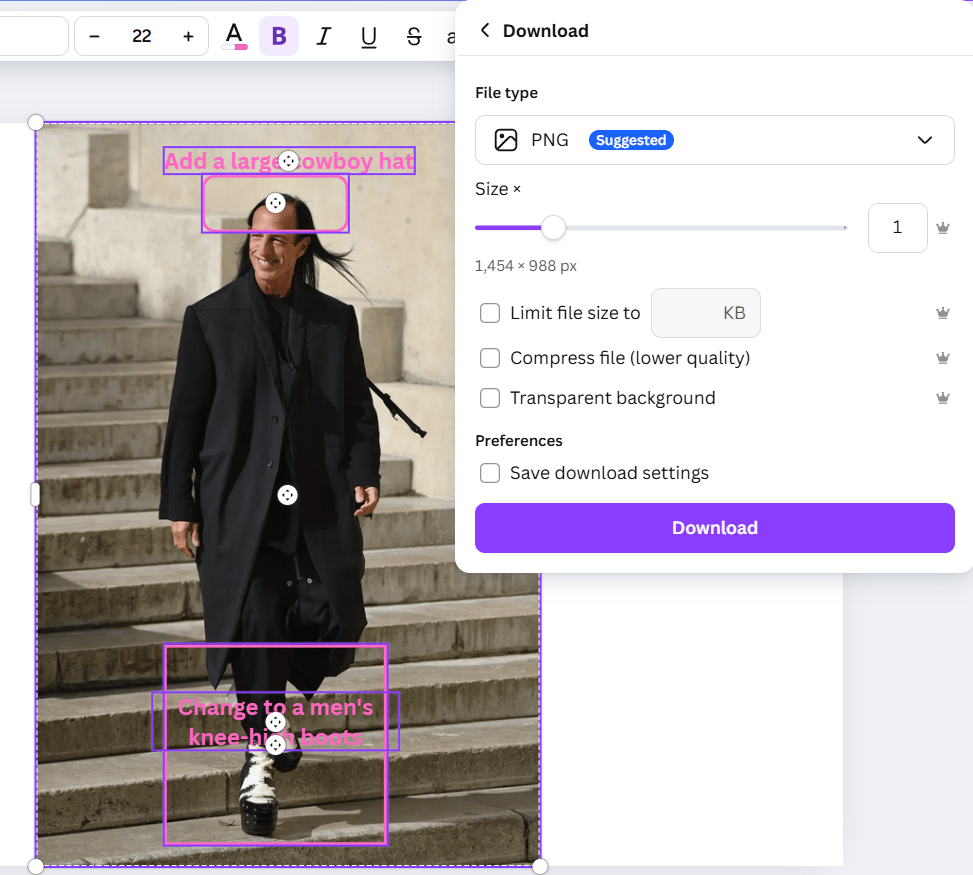
6. Download Selection as an Image
With all your elements selected:
-
Right-click to open the context menu.
-
Choose the “Download” selection. This is a special Canva feature that saves only your selected items as a single, combined image file.
-
Canva will ask for a format. PNG is usually best as it maintains high quality.
-
Save the file to your computer.
7. Open Nano Banana (Gemini 2.5 Flash Image)
Now, head over to Google AI Studio (or the Gemini interface) at aistudio.google.com/prompts/new_chat. Make sure your model is set to Gemini 2.5 Flash Image, which contains Nano Banana.
8. Upload Your Marked Image and Use the Universal Prompt
-
Click the image upload button (it looks like a paperclip or photo icon) and select the new, marked-up image you just downloaded from Canva.
-
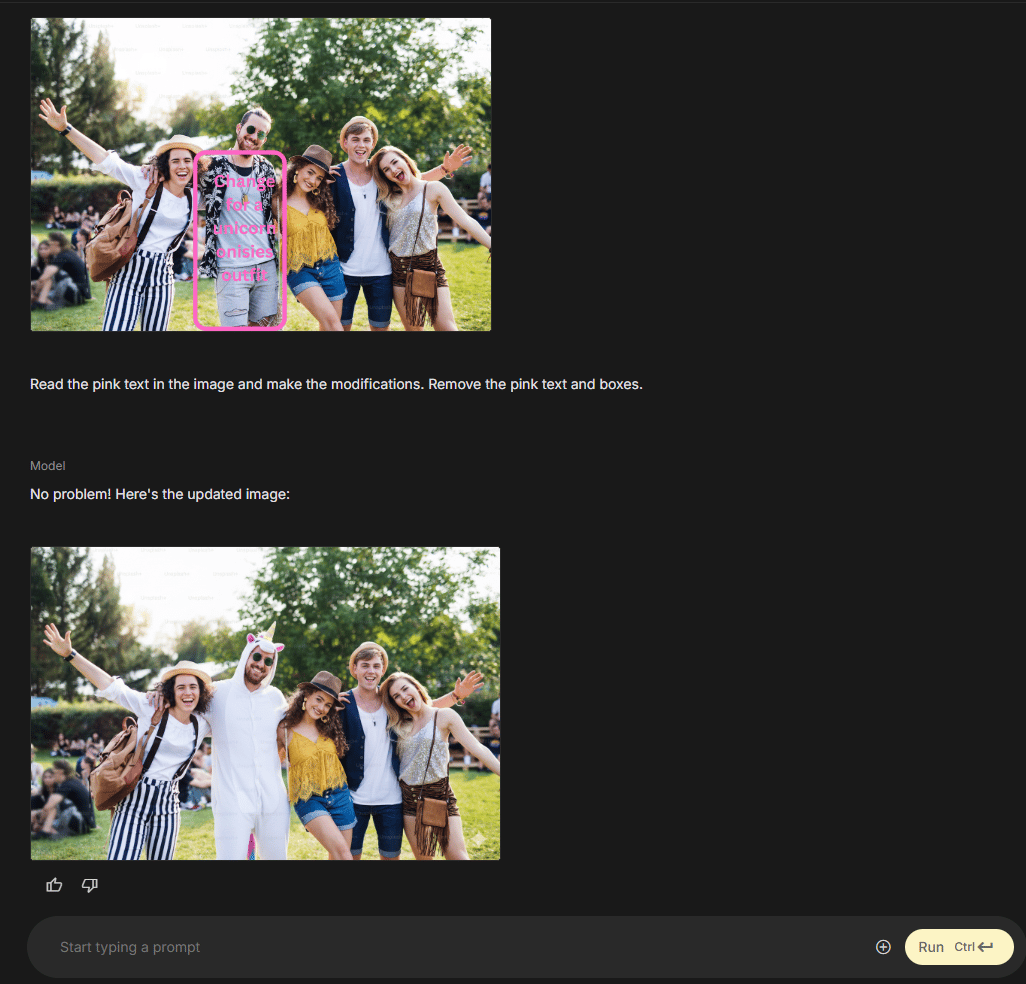
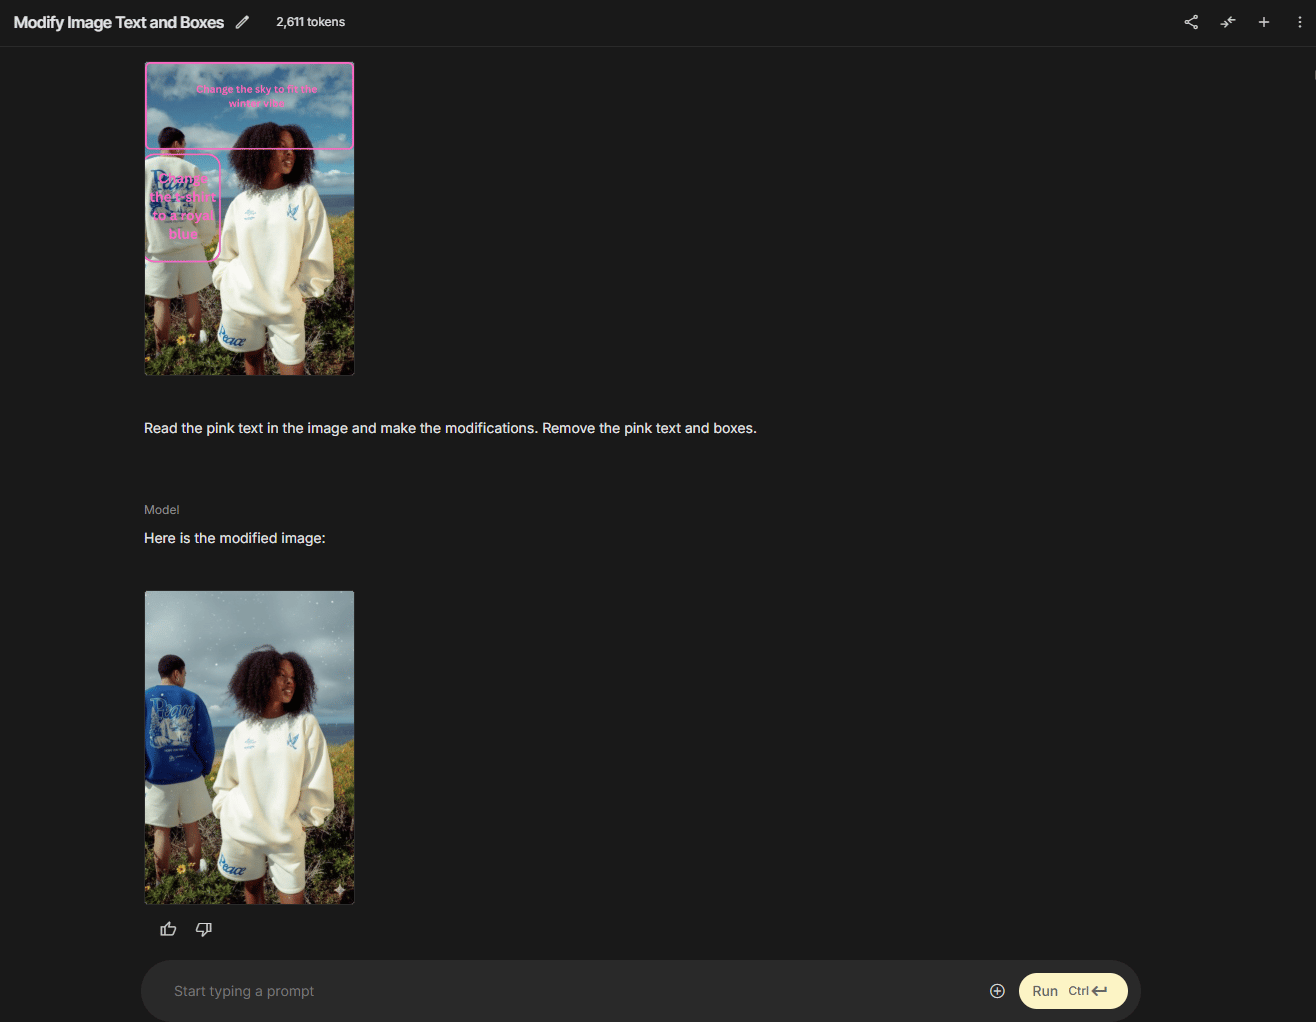
After the image uploads, type this simple, universal prompt into the chat box:
Read the pink text in the image and make the modifications. Remove the pink text and boxes.That’s it. That one sentence is all you need.
9. Review Your Perfectly Edited Image
Wait a few seconds. Nano Banana will process your request by:
-
Analyzing the image and identifying all the pink boxes.
-
Reading the text instructions linked to each box.
-
Applying those specific edits only to those specific locations.
-
Erasing all your pink markup (the boxes and text).
-
Generating a clean, final image with only your requested modifications.
The result is an edited image that matches your intentions with remarkable precision. No more random edits, no more confusing results and no more wasting 20 minutes to fix a sky that wasn’t broken. It just works.

V. Advanced Techniques: Getting Even More From This Workflow
Once you’ve mastered the basic workflow, you can use these advanced techniques to handle even more complex tasks.
1. Multiple Edits at the Same Time
Your AI can multitask. You don’t have to do one edit at a time. Want to change the sky and make a shirt blue and remove a car from the background? Go for it.
-
Just draw three separate pink boxes with three separate text instructions on your Canva image.
-
Nano Banana will read and execute all three edits at the same time, in a single generation.
-
This is powerful for complex image transformations that would normally require multiple difficult steps.
2. The Layered Improvement Approach
For extremely complex projects, you can “stack” your edits in layers.
-
Generation 1 (Big Changes): Start with the big changes. Upload your image to Nano Banana and ask it to remove a major object or change the entire background.
-
Generation 2 (Detail): Download the result from Generation 1. Upload that image to Canva. Now, add new, more detailed markup (e.g., change clothing colors, adjust lighting on a specific object).
-
Generation 3 (Polish): Repeat the process for final polishing. This layered approach prevents you from overwhelming the AI with too many confusing instructions at once, while still giving you precise, visual control at each stage.
-
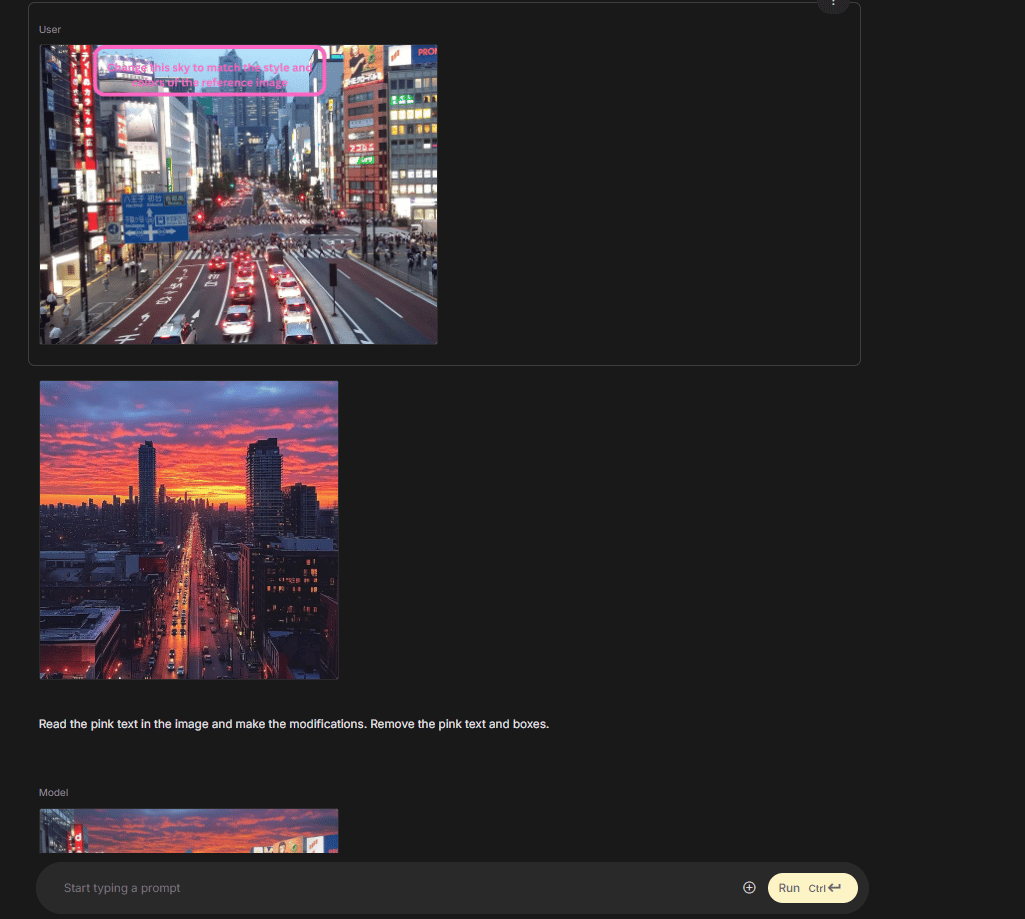
3. Reference Image Integration
You can combine this workflow with Nano Banana’s ability to use reference images.
-
Mark up your target image in Canva with your edit regions (e.g., a box around “the sky”).
-
In your text instruction, write: “Change this sky to match the style and colors of the reference image”.
-
Upload both your marked-up image and your reference image (e.g., a photo of a beautiful sunset) to Nano Banana.
-
The AI will apply your spatially precise edit (changing only the sky) while matching the aesthetic qualities of the reference image.
4. Template Reuse for Similar Edits
If you frequently make similar edits – like changing product colors for catalog photos or adjusting backgrounds for a portrait series – you can create reusable Canva templates.
-
Create a Canva design tool template with your pre-positioned rectangles and text placeholders.
-
For each new image, just swap the base image, type your new instructions into the text placeholders and export. This can cut your workflow down from one minute to about 10 seconds.
5. Color-Coding for Edit Types
While pink is the standard, you can experiment with using different colored boxes for different types of edits.
-
Example: pink boxes for “modify”, red boxes for “remove” and blue boxes for “lighting/style”.
-
Instruction: Add a simple text legend to your markup: “Pink = Modify, Red = Remove, Blue = Change Lighting”.
-
Nano Banana is often smart enough to understand this color-coding system, giving you another layer of control for complex multi-edit scenarios.
Creating quality AI content takes serious research time ☕️ Your coffee fund helps me read whitepapers, test new tools and interview experts so you get the real story. Skip the fluff – get insights that help you understand what’s actually happening in AI. Support quality over quantity here!
VI. Why This Works: The “Under the Hood” Explanation
This workflow isn’t a hack or a lucky trick. It works because it respects how multi-modal AI models are designed to “think”. When you just use text, you’re forcing the AI to guess. When you use visual markup, you’re speaking its native language.
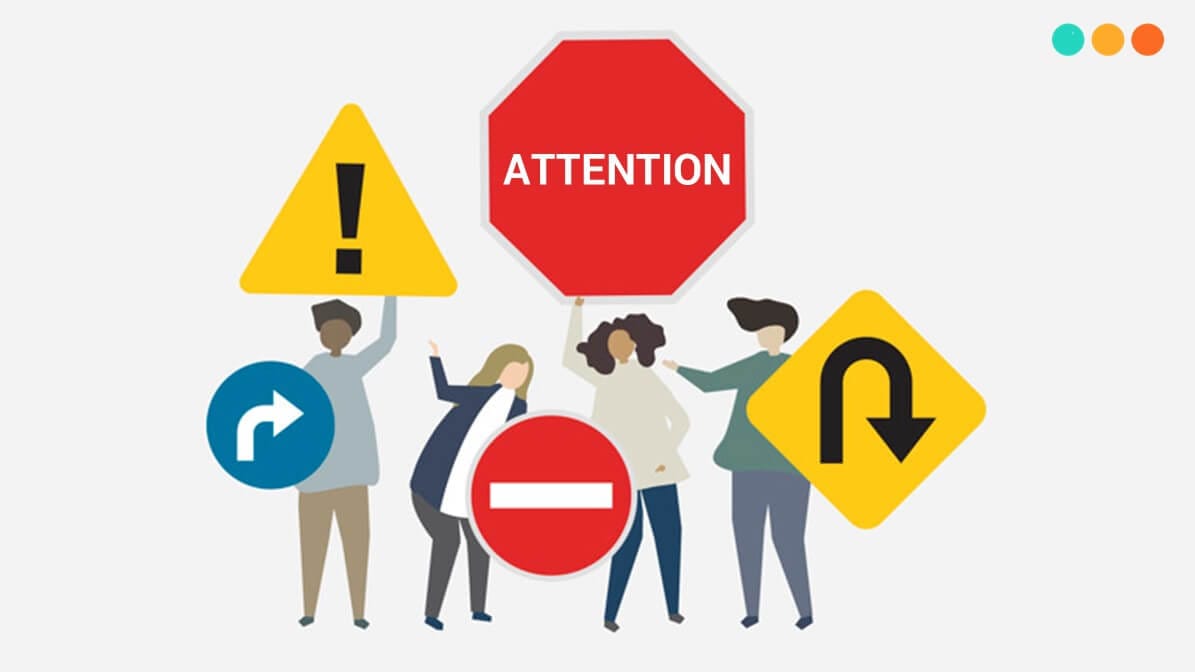
1. Guiding the AI’s “Attention”
AI vision models use a process called “attention mechanisms” to decide which parts of an image are important. When you draw a giant, bright pink box on an image, you are essentially yelling at the AI, “HEY! PAY ATTENTION TO THIS SPECIFIC SPOT!” You are directly guiding its attention in the language it understands (pixels), not forcing it to guess from unclear text.
2. Solving the “Latent Space” Problem
This is the expert-level insight. When you just type “change the shirt”, the AI has to wander through its giant, confusing brain (what we call “latent space”) looking for all the pixels that might statistically represent a “shirt”.
It’s a guess. When you draw a box, you’ve already done the hard part for it. You’ve narrowed its search from the entire universe of images down to a tiny, specific area. The chances of it getting the right answer go from 50/50 to 99.9%.
3. Multi-Modal Information Fusion
Nano Banana (as part of Gemini 2.5 Flash Image) is a true multi-modal model. It doesn’t just read text or see images; it integrates them. This workflow is the perfect use case for that.
-
Visual Data: The pink box tells the AI where to look (location information).
-
Text Data: The text box tells the AI what to do (meaning information). The AI fuses these two data streams together naturally, resulting in a precise, intended action. It’s not a hack; it’s just speaking the AI’s language.
VII. How This Compares to Other Editing Methods
This Canva workflow isn’t the only way to edit images but for this specific task, it offers a “just right” balance of power and simplicity.
1. Pure Text Prompting:
-
Advantage: Simple, requires only the AI design tool.
-
Disadvantage: Not exact about location (it’s a guessing game), takes forever to get right (“No, the other shirt!”), demands you become a prompt-engineering wizard and the results are still unpredictable. The Canva way wins, hands down, for precision.
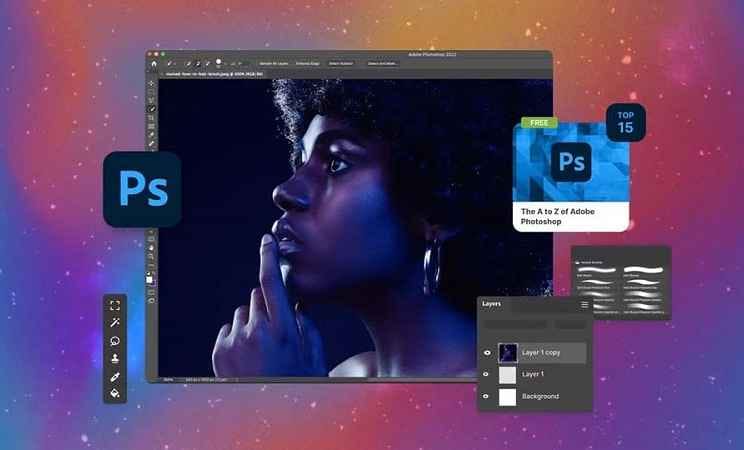
2. Inpainting Masks in Professional Software (e.g., Photoshop):
-
Advantage: Pixel-perfect precision and professional-grade control.
-
Disadvantage: Requires expensive software (Photoshop), has a very steep learning curve and the manual selection process is time-consuming. The Canva workflow provides 95% of the precision for 10% of the effort.
3. Object-Detecting Editing Tools:
-
Advantage: Some tools (like Meta’s Segment Anything) can automatically identify common objects, letting you click on them to edit.
-
Disadvantage: You’re limited to what the object-detecting model recognizes. It can’t identify “the mood”, “the lighting in the corner” or other unclear concepts. The Canva workflow offers far more flexibility.
4. Conversational Refinement:
-
Advantage: A natural way to interact, progressively improving the result.
-
Disadvantage: Incredibly time-consuming. It can take 10 or 15 generations to get it right (“No, a little more blue… no, that’s too much…”). This eats through your time and any free usage limits. The Canva workflow aims for a one-shot success.
For most people, the Canva approach offers the optimal balance of precision, accessibility, speed and flexibility.
VIII. Practical Applications Across Industries
This workflow isn’t just a clever trick; it enables practical, time-saving applications across numerous professional and creative fields.
1. E-Commerce Product Photography
Online retailers are a perfect use case. They constantly need to modify product images – changing the colors of a product for different variants, adjusting backgrounds to be a clean white, removing distracting reflections or updating images for seasonal contexts. The Canva workflow allows them to batch-process an entire product catalog without expensive photo reshoots or hours of manual Photoshop work.
2. Social Media Content Creation
Influencers and marketers need to create dozens of image variations for testing and platform optimization. With this workflow, they can mark up a single template image with different color schemes, background options or element placements, generate 10 variations in minutes and test which one performs best with their audience.
3. Real Estate Marketing
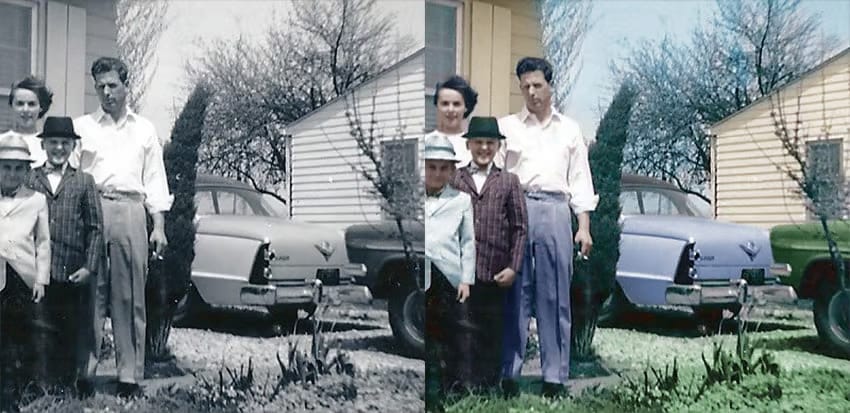
Property photos often need big improvements. This workflow enables quick, professional-quality improvements like making a gray sky blue, removing an ugly trash can from a lawn, digitally adding autumn leaves to trees or even showing a “virtual staging” concept by removing old furniture and adding new.
4. Graphic Design Drafting
Designers can quickly explore concepts by marking up rough drafts with wanted changes, generating variations and trying again. This accelerates the creative process, allowing for the exploration of more concepts in less time.
5. Educational Content Creation
Teachers can mark up existing images to create specific educational examples – like highlighting body parts on a diagram, adding accurate costume details to a historical photo or visualizing a math problem.
6. Personal Photo Enhancement
Beyond professional use, this is a game-changer for personal photos. You can finally remove that random person from the background of your perfect vacation shot, enhance the sunset in a family photo or create custom artwork from your own pictures – all with a level of precision that was previously only possible for professionals.
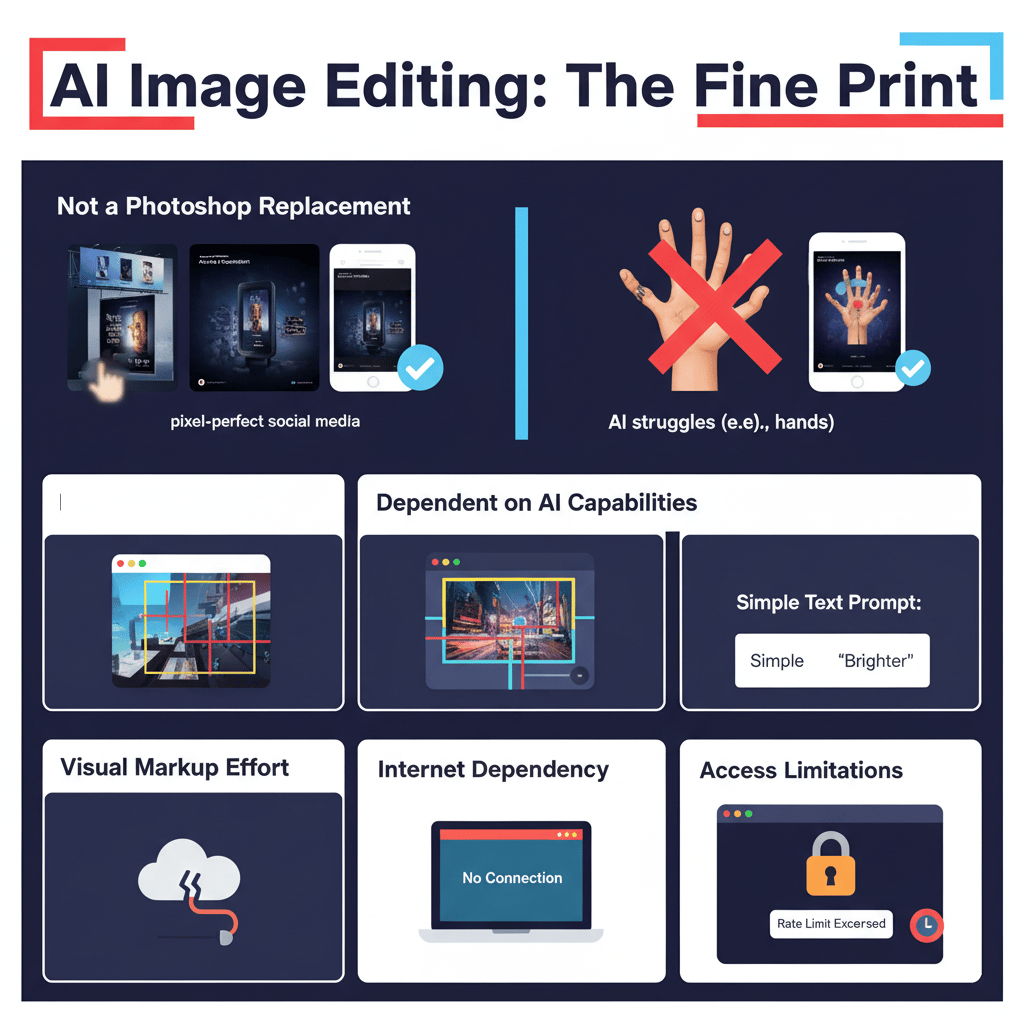
IX. Limitations and Considerations (The Fine Print)
This workflow is powerful but it’s important to be realistic. It’s not a magic wand that solves every problem.
-
Not a Complete Photoshop Replacement: Let’s be clear. This isn’t going to replace a $50,000-a-year professional photo retoucher who has mastered Photoshop. If you need pixel-perfect, high-end commercial work for a billboard, you still need traditional tools. But for 90% of what most of us do for web and social media? This is faster and more than good enough.
-
Dependent on Nano Banana’s Capabilities: Your results are still limited by what Nano Banana can do. If the AI model is bad at creating realistic human hands or changing extreme perspectives, this workflow won’t fix that. It just helps you tell the AI where to do its work more exactly.
-
Requires Visual Markup Effort: For very simple edits (“make the whole image brighter”), a pure text prompt is still faster. This workflow’s value shines when the edit is for a specific area (“make only the lamp brighter”).
-
Internet Dependency: Both Canva and Nano Banana are cloud-based tools and require a stable internet connection.
-
Access Limitations: While Nano Banana is currently available in Google AI Studio (often for free), usage limits exist. Heavy users might hit rate limits and Google’s policies on free access may change over time.
X. Conclusion: When Visual Problems Need Visual Solutions
For the past two years, I’ve felt like we’ve all been doing it wrong. We’ve been trying to think like the AI, twisting our brains to describe a simple visual idea (“I want to change this shirt”) with clunky, inefficient text prompts. It’s frustrating and half the time, it doesn’t even work.
This Canva-to-Nano-Banana workflow flips that relationship on its head. It makes the AI adapt to our natural, human-first way of thinking. The concept is simple: use a visual design tool for visual tasks. “It just makes sense”.
This is more than just a hack; it’s a better way to collaborate with AI. It proves the solution isn’t always a more complex prompt. The solution is a smarter interface that lets us communicate naturally.
Nano Banana’s incredible technical power was always there, just locked behind a frustrating text-only door. This simple Canva workflow is the key that finally unlocks it. It transforms a confusing, “hit-or-miss” design tool into the exact, reliable and powerful creative assistant we were all promised from the start.
If you are interested in other topics and how AI is transforming different aspects of our lives or even in making money using AI with more detailed, step-by-step guidance, you can find our other articles here:
-
Forget “Note-Taking”! NotebookLM Is Your Personal AI POWERHOUSE
-
Notion 3.0 Isn’t a Note App. It’s A Full AI “Operating System”
-
Stop Feeding Your AI Expired GARBAGE*
*indicates a premium content, if any
Leave a Reply