
Learn how to combine Deep Research, Gemini styling, and new NotebookLM features to create polished presentations in minutes without PowerPoint templates.. Ai Tools, Ai Fire 101, Ai Reports, Ai Workflows.
TL;DR BOX
In 2026, NotebookLM is no longer just for summaries. It is now a powerful tool for making professional videos, slides and data reports. The defining shift is the integration with Gemini 3 for visual styling and the launch of Deep Research, which automates the gathering of dozens of sources in minutes. By using a “Style-Stealing” Gemini trick, you can bypass the dated default templates and generate slides that look designer-made while maintaining 100% source fidelity.
New NotebookLM features like Single-Slide Revision let you fix just one mistake on a slide without starting over. You can also turn messy notes into clean Data Tables (spreadsheets) instantly.
Key Points
-
Fact: NotebookLM now supports a one-million-token context window, allowing it to reason across up to 300 sources (on Pro plans) for a single presentation.
-
Mistake: Using “Detailed” infographic settings. In 2026, the “Standard” setting is the sweet spot; “Detailed” often creates text-heavy, unreadable graphics.
-
Action: Find a pretty slide design on Pinterest. Ask Gemini to “describe the style”, then paste that text into the NotebookLM feature instruction box so your slides look professional for free.
Critical Insight
The real advantage of 2026 is Source Grounding. Unlike Gamma or Canva, NotebookLM is the only tool that guarantees its output is strictly based on your provided material, eliminating the risk of AI “hallucinations” in professional pitch decks.
Table of Contents
I. Introduction
NotebookLM’s content has always been brilliant but its design was… embarrassing.
You can ask it for a slide deck or an infographic and you get something accurate, well-structured and completely faithful to your source material. That part is genuinely impressive.
Then you look at the slides: random colors, stiff layouts with that unmistakable “AI template” feel and your excitement fades pretty quickly. You can put 10 NotebookLM decks side by side and they could all be the same.
For internal notes, that’s fine. But for a client pitch, investor deck or paid workshop, it’s a problem.
The good news is there’s a fix. It’s free, uses Gemini and takes only a few minutes to set up. And on top of that, Google just shipped 3 new NotebookLM features that together turn it into a much stronger presentation tool.
II. Why NotebookLM, not ChatGPT or Gemini Standalone?
NotebookLM generates content strictly from the sources you provide. This ensures that presentations remain accurate and grounded in real material. Other AI tools sometimes add external context or unsupported claims. NotebookLM prioritizes reliability over creative expansion.
Key takeaways
-
NotebookLM only uses provided source materials.
-
This reduces hallucinations compared to general chatbots.
-
Reliable outputs are critical for reports and presentations.
-
Sources can include PDFs, videos, documents and web pages.
The keyword is source fidelity.
When NotebookLM generates a presentation or infographic, every single piece of content comes strictly from the sources you gave it, like your PDFs, your videos, your documents or research it pulled together for you.

Instead of hallucinating or wandering off-topic, it simply stays inside your materials.
For anything that actually matters (a client presentation, educational content, a report for your boss) that constraint is a feature, not a bug.
ChatGPT and Gemini are brilliant but they’ll occasionally drift, add context you didn’t provide or confidently state something that isn’t in your source.
NotebookLM is the only AI presentation tool that guarantees its output is grounded in what you actually gave it.

In 2026, where AI trust is the biggest currency, that constraint is a feature, not a limitation. That’s exactly what the next section explains.
Learn How to Make AI Work For You!
Transform your AI skills with the AI Fire Academy Premium Plan – FREE for 14 days! Gain instant access to 500+ AI workflows, advanced tutorials, exclusive case studies and unbeatable discounts. No risks, cancel anytime.
Start Your Free Trial Today >>
III. The Default Workflow (What Everyone Does First)
Here’s how the default workflow usually goes.
1. Add a Source
Your source can be a PDF, a YouTube video, a URL, a Google Doc or even a pasted block of text. NotebookLM accepts almost anything.

2. Open the Studio Panel
On the right side of the screen, you’ll see the Studio panel. This is where all the output options live.

3. Pick an Output Type
You can generate an Audio Overview (a podcast-style conversation), an Infographic or a Slide Deck. For infographics, you’ll also choose a detail level: Concise, Standard or Detailed.
One quick note on the Detailed setting: skip it unless you have a specific reason to use it. In most cases, Standard is the best option. The Detailed setting tends to pack in so much text that the graphic stops being visual.

4. Click Generate
About 30 seconds later, NotebookLM produces a clean, well-structured output. And it will probably look exactly like every other NotebookLM output online.

Example of a slide deck that was created by NotebookLM.
Before you hit Generate, there’s a small pencil icon you can click. That opens a field where you can add custom instructions. The option has been there for a while but most people ignore it because they aren’t sure what to write.
That’s where the Gemini trick becomes useful.
Once you understand NotebookLM’s default workflow, the next step is fixing its biggest weakness: design.
IV. The Gemini Style-Stealing Trick
The idea is simple: instead of letting NotebookLM choose the visual style, you bring your own.
You find a visual style you like, ask Gemini to describe it precisely, then give that description to NotebookLM as instructions. It now has a clear design brief instead of guessing.
Here’s how it works in three steps.
Step 1: Find a Style You Like
Open Google Images and search for the aesthetic you want. Some useful search terms:
-
“learning infographic design”.
-
“corporate infographic template”.
-
“flat vector infographic style”.
-
“minimal presentation slide design”.

You don’t need to look for a topic that matches yours; what you’re looking for is the visual language. Save the image once you find something that feels right.
Step 2: Let Gemini Break It Down
Open Gemini (the free version is all you need) and upload the image. Then use this exact prompt:
I have uploaded an image. Describe the visual features in detail so that I can get a prompt to replicate this exact style as that of the image.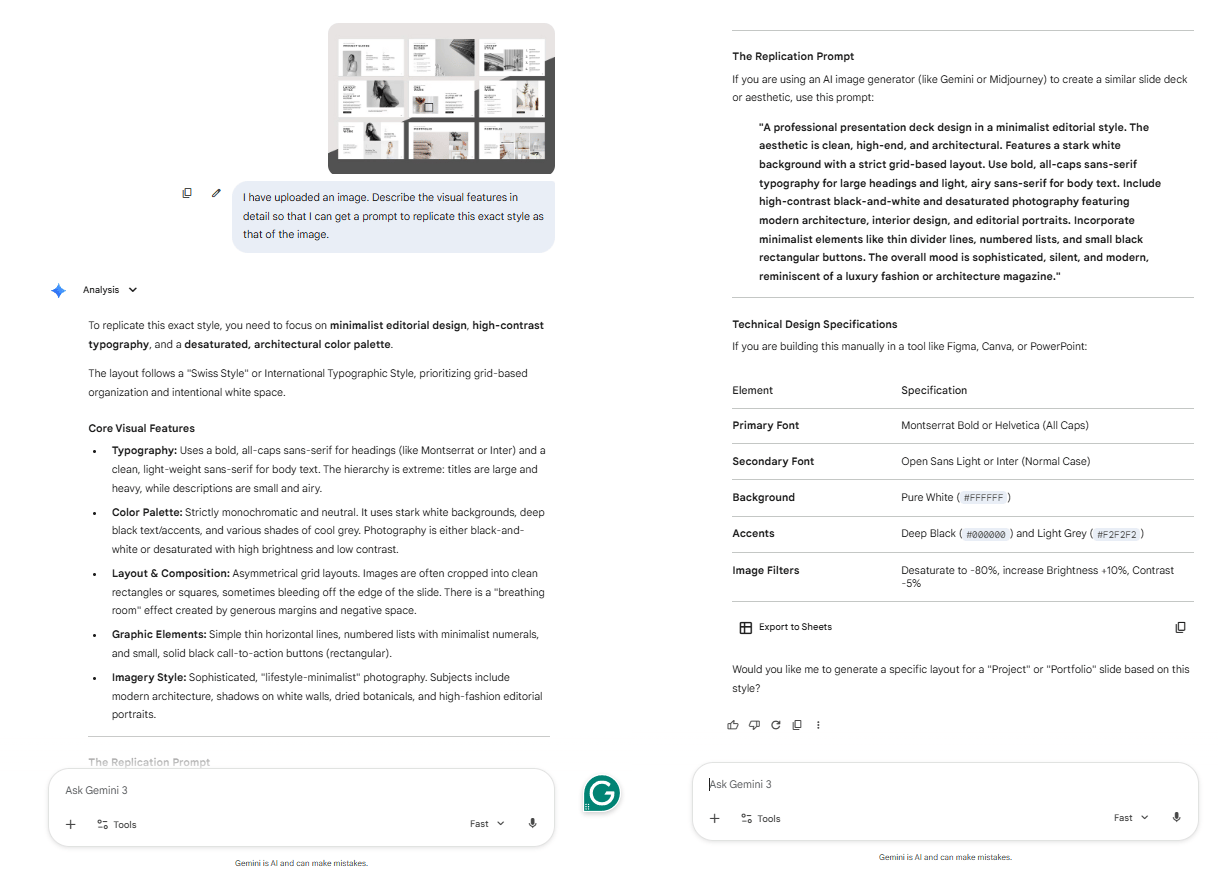
Gemini will analyze the image and describe everything: the illustration style, colors, typography, layout structure, visual hierarchy and icon treatment.
It writes out a detailed paragraph describing everything you see in the image, in language that a design tool or AI can act on.
That description becomes the key input.
Step 3: Feed It to NotebookLM
Finally, return to NotebookLM. Before generating, click the edit icon and paste Gemini’s style description into the custom instructions field.
Then generate the slides. This time, you will get a completely different result, even though the source material and the tool are the same.
-
The colors match your reference.
-
The layout feels intentional.
-
The slides suddenly look like they were designed by a professional.


The content doesn’t change but the professionalism jump is huge.
V. Applying the Same Trick to Slide Decks
The Gemini workflow transfers directly to presentations, with one useful upgrade.
When you choose Slide Deck instead of Infographic, you get 2 sub-options worth understanding:
-
Presenter Slides: clean and minimal, designed for live presenting where you do most of the talking. Low text, high visual.
-
Detailed Deck: more content per slide, designed as a standalone document someone can read on their own without a presenter.

Pick the format that fits your actual use case. A deck you’re presenting live should look different from one you’re emailing to a client.
The workflow stays the same: Google Images → Gemini → paste the style description. But for slide decks, there’s an extra layer of control worth using: audience targeting.
After pasting the Gemini style description into the customize field, add a second instruction like this:
The audience are [describe your audience]. Keep explanations [beginner-friendly / technical / executive-level].

It changes how the content is written (the vocabulary, the depth, the sequencing of ideas).
-
If the audience is beginners, the slides add context and simplify terms.
-
If the audience is executives, the content focuses on outcomes and key numbers.
So both the visual style and the content style get tuned at the same time. That’s the real upgrade.
VI. Removing the NotebookLM Watermark for Free
Every NotebookLM slide deck includes a small “NotebookLM” watermark at the bottom of each slide. That makes sense for a free tool and Google wants the credit but it can look out of place in a client presentation.
There is a quick paid option: upload the PDF to Canva Pro and erase it with Magic Eraser. But if you’d rather not pay for another subscription, here’s the free workaround.

Why PDFs are Tricky
The reason this requires a workaround is that PDFs flatten everything into images. You can’t select individual elements, which is why the watermark can’t be deleted directly.
So the trick is converting the file back into an editable format. Here’s the step-by-step:
-
Export your NotebookLM deck as a PDF.


-
Upload the PDF, convert it and download the PowerPoint (.pptx) file.

-
Open Google Slides → File → Import Slides → upload the .pptx.

-
Click on the watermark on any slide. It’s now just a text box with fully selectable.

-
Delete it and repeat across the deck.
The entire process usually takes about 2 minutes for a full deck and doesn’t require any paid tools.
One small note: converting from PDF to PowerPoint may compress images slightly. In most cases, the difference is barely noticeable for normal presentations.
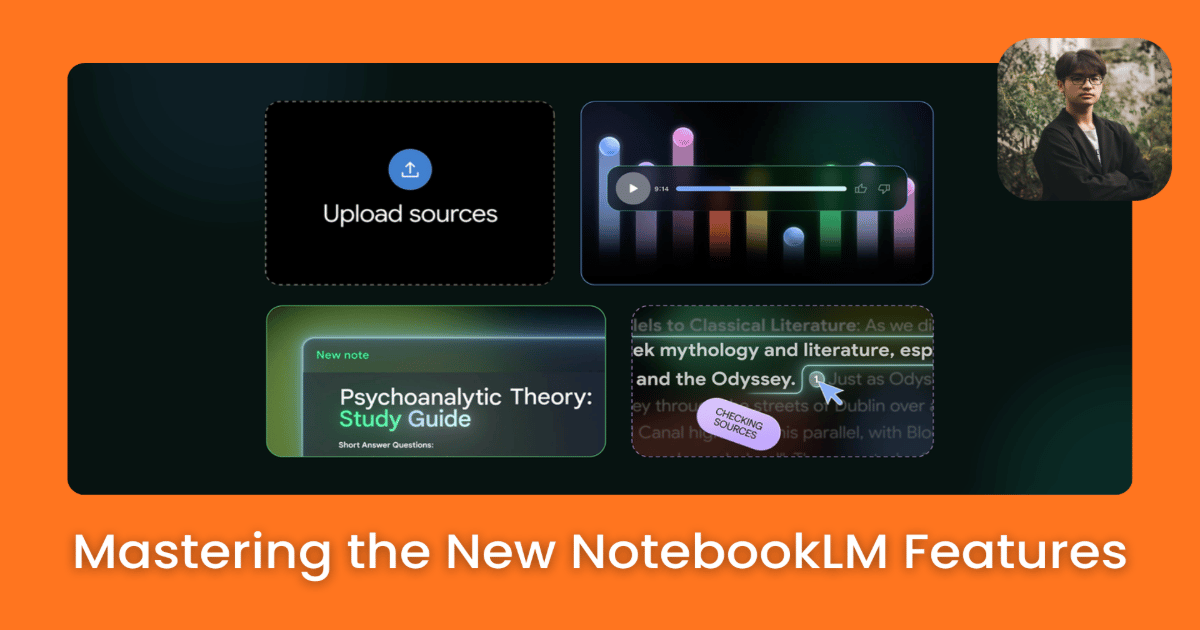
VII. 3 New NotebookLM Features
Google recently shipped 3 new NotebookLM features that, together, turn NotebookLM from a content tool into a complete professional workflow.
Here’s each one broken down.
NotebookLM Feature #1: Deep Research
Preparing a presentation on a new topic usually means hours of reading articles, saving links, copying quotes and juggling 20 browser tabs before any actual work begins.
Deep Research removes most of that.
First, you create a new notebook in NotebookLM. You’ll see a search bar at the top with two options: Fast Research and Deep Research.
-
Fast Research does a quick scan, grabs some links and lets you choose which to import. Good when you already know the topic well and just need a few sources to fill gaps.
-
Deep Research is the powerful one. Type your topic, click the dropdown, select Deep Research and hit the plus icon. NotebookLM will plan out a research strategy (which angles to cover, which source types to prioritize, what search terms to use) and then run it. It usually takes around six minutes and runs in the background while you work on something else.

When it finishes, you get dozens of sources (websites, GitHub repositories, Reddit threads, research papers) all scraped, organized and ready to import.
Then, you click Import, remove any sources that failed to load and your left panel is now populated with a full research foundation.
In one test session, Deep Research on a single topic returned 48 sources in about six minutes, without opening a single tab manually.

Once those sources are loaded, every output you generate, including infographics, slide decks and data tables, pulls from this foundation.
The output is grounded before you start creating anything.
NotebookLM Feature #2: Single-Slide Revision
Previously, if one slide in a generated deck wasn’t right, the only option was to regenerate the entire presentation and lose any adjustments you had already made.
Single-Slide Revision solves that problem.
The process is simple:
First, open your deck, find the slide that needs work and click the revise icon (in the top-right corner of that slide). A small prompt box appears where you can describe exactly what to change.

For example:
This slide is too dense. Break it into a simple three-step bullet list. Keep the tone professional but easy to understand.

When you generate a new deck, NotebookLM applies those specific changes while preserving the rest of the presentation. The original version stays saved, allowing you to compare or revert if needed.
Bonus: When your deck is polished, click the three dots in the top right. You now have the option to download directly as PowerPoint (.pptx) without a PDF conversion workaround needed. Open it in Google Slides via File → Import Slides → upload the .pptx → select all → import and you’re fully inside Google Slides for any further edits.

Google has confirmed that a direct export to Google Slides (no download step) is currently in development.
Creating quality AI content takes serious research time ☕️ Your coffee fund helps me read whitepapers, test new tools and interview experts so you get the real story. Skip the fluff – get insights that help you understand what’s actually happening in AI. Support quality over quantity here!
NotebookLM Feature #3: Data Tables
A new NotebookLM feature has appeared in the Studio panel, right alongside Audio Overview, Slide Deck and Infographic: Data Tables.
In plain terms: you give NotebookLM a messy collection of sources and it extracts structured data into clean rows and columns, like a spreadsheet, automatically.
Once your notebook contains research materials, you can request a table with specific columns.
Here are some examples you can try:
-
“Create a table of all AI tools mentioned. Columns: tool name, pricing, features, best use case.”
-
“Turn these meeting transcripts into action items: task, owner, priority, deadline.”
-
“Extract every statistic mentioned with source, year and context.”

Once the table is generated, click Export to Google Sheets. From there, you can sort, filter and share the information as you would with any spreadsheet.

This capability is what separates NotebookLM from a typical chatbot. Instead of simply answering questions, it produces structured outputs (tables, slides and visuals) grounded in the sources you provide and ready to use in real work.
Here’s how the entire system fits together from start to finish.
VIII. The Full Pipeline: Start to Finish
Now let’s connect everything into one complete workflow, from blank notebook to polished, professional presentation:
|
Step |
What You Do |
Tools Used |
Key Output |
Purpose |
|---|---|---|---|---|
|
Research |
Create notebook → run Deep Research → import 40-50 sources |
NotebookLM |
Research sources |
Build factual foundation |
|
Find Style |
Search for visual reference and save image |
Google Images |
Style reference image |
Define visual direction |
|
Extract Style |
Upload image → generate style description |
Gemini |
Style prompt text |
Convert design into AI instructions |
|
Generate |
Create infographic or slide deck using style prompt |
NotebookLM Studio |
Generated presentation |
Turn research into slides |
|
Refine |
Fix weak slides → regenerate deck |
NotebookLM Studio |
Improved slides |
Polish the presentation |
|
Extract Data |
Export structured info to spreadsheet |
Google Sheets |
Data tables |
Reuse insights and numbers |
|
Export & Clean |
Download PPT or convert PDF → Slides |
PowerPoint / Google Slides |
Final presentation |
Ready for sharing |
Total time for a polished, source-accurate, custom-branded presentation: under 15 minutes.
IX. How Does NotebookLM Compare to Canva, Gamma and Other AI Tools?
NotebookLM stands out because it focuses on source-grounded content. Most AI presentation tools emphasize design but rely on general knowledge generation. NotebookLM ensures that every slide reflects real sources. This makes it especially useful for research-driven presentations.
Key takeaways
-
NotebookLM guarantees source-based outputs.
-
Canva and Gamma prioritize design flexibility.
-
Other AI tools often generate unsourced content.
-
NotebookLM integrates research, slides and data extraction.
Reliable information is often more valuable than visual polish alone.
|
Feature |
NotebookLM |
Canva |
Gamma |
ChatGPT / Gemini Standalone |
|---|---|---|---|---|
|
Source-grounded content |
✅ Only this |
❌ |
❌ |
❌ |
|
Infographic generation |
✅ Free |
✅ Paid |
✅ Paid |
⚠️ Limited |
|
Slide deck generation |
✅ Free |
✅ Paid |
✅ Paid |
⚠️ Limited |
|
Custom style control |
✅ With Gemini trick |
✅ Full |
✅ Some |
❌ |
|
Deep research + import |
✅ Built-in |
❌ |
❌ |
❌ |
|
Single-slide revision |
✅ New feature |
✅ |
✅ |
❌ |
|
Data table → Sheets export |
✅ Built-in |
❌ |
❌ |
❌ |
|
Watermark-free (free tier) |
⚠️ Workaround needed |
✅ Paid |
✅ Paid |
N/A |
|
Cost |
Free |
Freemium |
Freemium |
Freemium |
Tools people pay for monthly are being outcompeted by a free Google product with the right workflow.
X. Both 2 Prompts You Need
If you want a quick summary, here are the 2 prompts you need to create your media assets.
For infographics (Gemini prompt):
I have uploaded an image. Describe the visual features in detail so that I can get a prompt to replicate this exact style in another tool.For slide decks (Gemini prompt):
Explain this presentation slide design in detail (the layout, color palette, typography and visual elements) so I can recreate this style for a different topic.Then, inside NotebookLM’s customize field, paste the full Gemini output and add:
The audience are [describe your audience]. Keep explanations [beginner-friendly / technical / executive-level].XI. Conclusion
NotebookLM has quietly become one of the most underused productivity tools in many teams.
Most people use a simple NotebookLM feature: Audio Overview. Far fewer know about Deep Research, Single-Slide Revision, Data Tables or the Gemini style trick and the gap between people who know these features and those who don’t is only going to grow.
Getting started doesn’t take much time. Here’s a simple action plan to get started:
-
Open NotebookLM and run Deep Research on your current project.
-
Find a “Minimalist Tech” style on Pinterest.
-
Use Gemini to extract the style and generate your first custom deck.
Many tools people pay for today are already being replaced by free ones. The advantage simply comes from knowing how to use them.
If you are interested in other topics and how AI is transforming different aspects of our lives or even in making money using AI with more detailed, step-by-step guidance, you can find our other articles here:
-
Google Antigravity Advanced Mastery Guide: 100 Hours of Agent in Under 1 Hour*
-
STOP Working For Your AI. Make Your AI Work For YOU (With Sub-Agents)*
-
How To Do Voice Cloning For FREE Without An Internet Connection
-
A 9 AI Skills You Must Have to Master ChatGPT, Claude, Gemini or any Other Als
*indicates a premium content, if any
Leave a Reply